Origin of the Biker Jacket
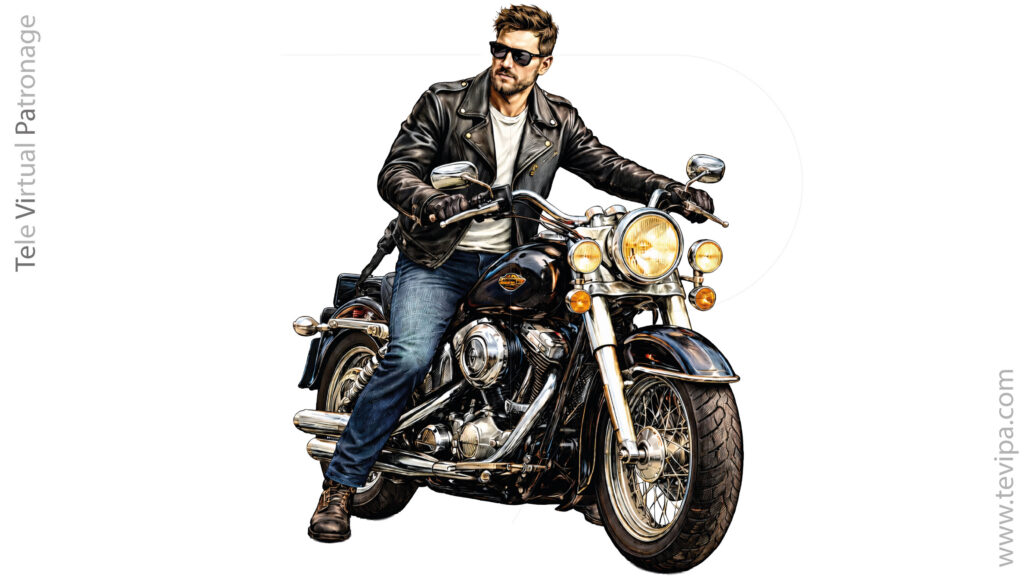
The biker jacket finds its absolute reference in the Schott Perfecto, a design that revolutionised technical clothing in 1928.
Created by Irving Schott in New York, it was not just another garment: it defined the DNA of what we understand today as the “Perfecto.”
It was the first motorcycle jacket to replace buttons with a zipper, and its success was consolidated through Harley-Davidson’s distribution network.
Materials
Exterior
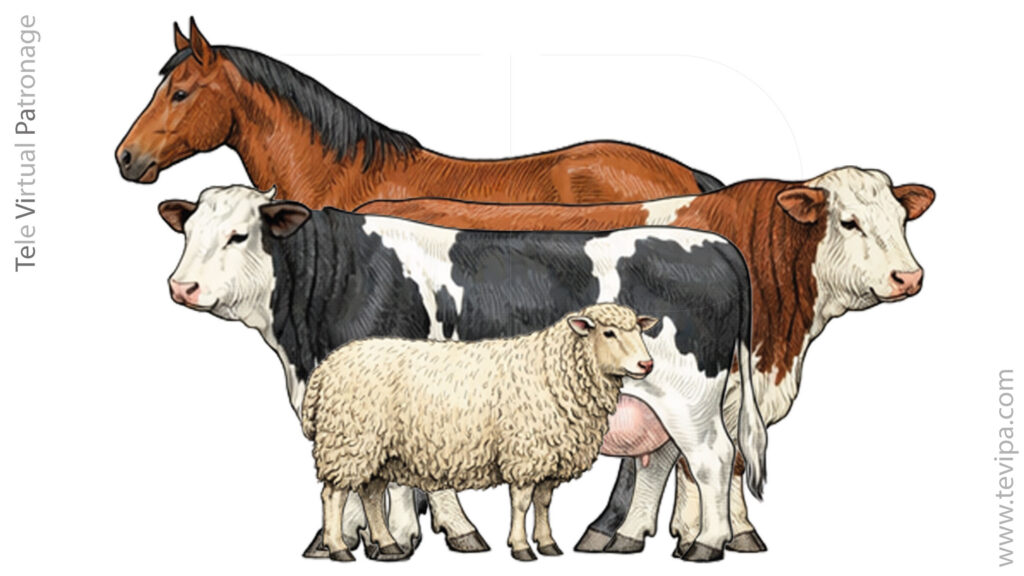
The original Biker jacket was made from horsehide, a dense, rigid leather highly resistant to abrasion.
It creates an armour-like sensation that the wearer must “tame.”
Over time, steerhide (young bull leather) was introduced in models such as the 618, followed later by cowhide and sheepskin versions for urban fashion models.
Interior: The Linings

Body lining: it uses 5.5 oz quilted nylon with the characteristic diamond pattern.
Its function is thermal — insulating the torso. Historically, wool linings (1940s/50s), cotton/polyester blends for the European market, and Sherpa linings (shearling-style fleece) for special editions have also been used.
Sleeve lining: historically, the sleeves are generally not quilted.
A smooth nylon lining or a highly resistant rayon/cotton twill is used to reduce bulk and facilitate movement.
Although extreme winter versions with thin padding exist, the standard classic 618 configuration uses smooth sleeve linings.
Anatomy of a Legend

To understand its structure, we must analyse one by one the critical points that turn this jacket into a piece of engineering.
Each element is studied in isolation in order to reproduce it accurately and transfer it to other pattern blocks.
In this way, the biker jacket ceases to be a specific model and becomes a system of resources applicable to any design.
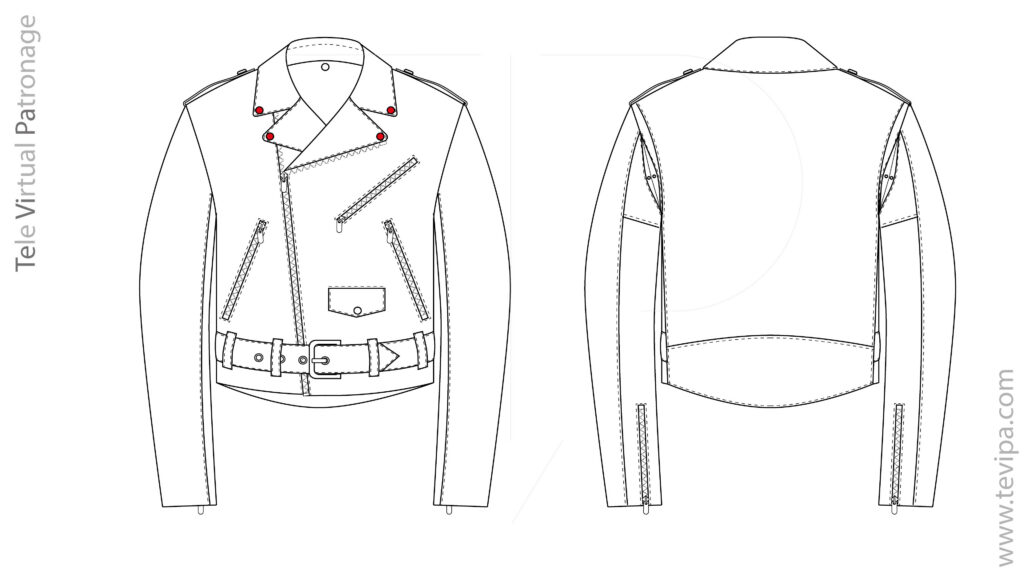
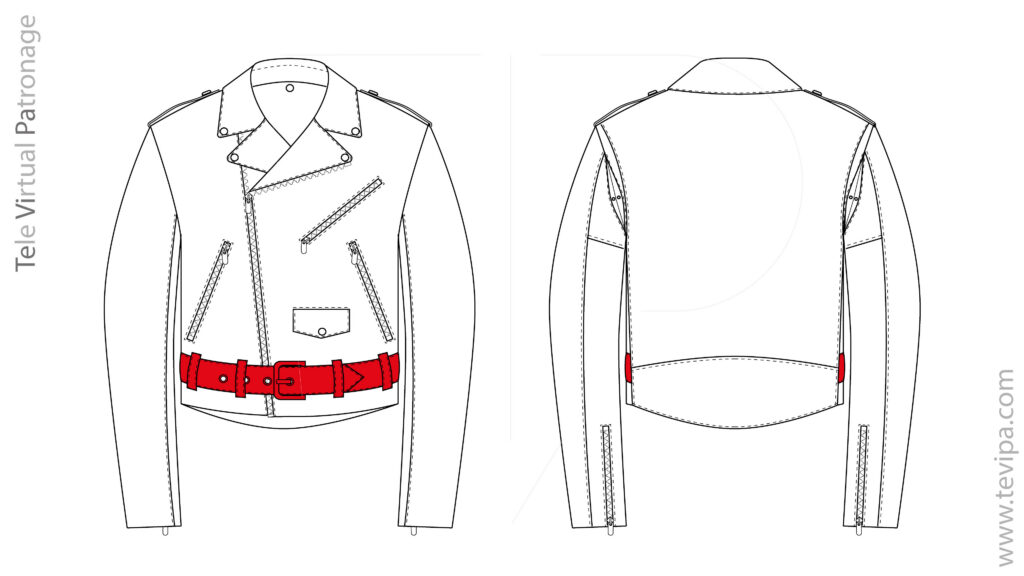
Biker Jacket Nomenclature
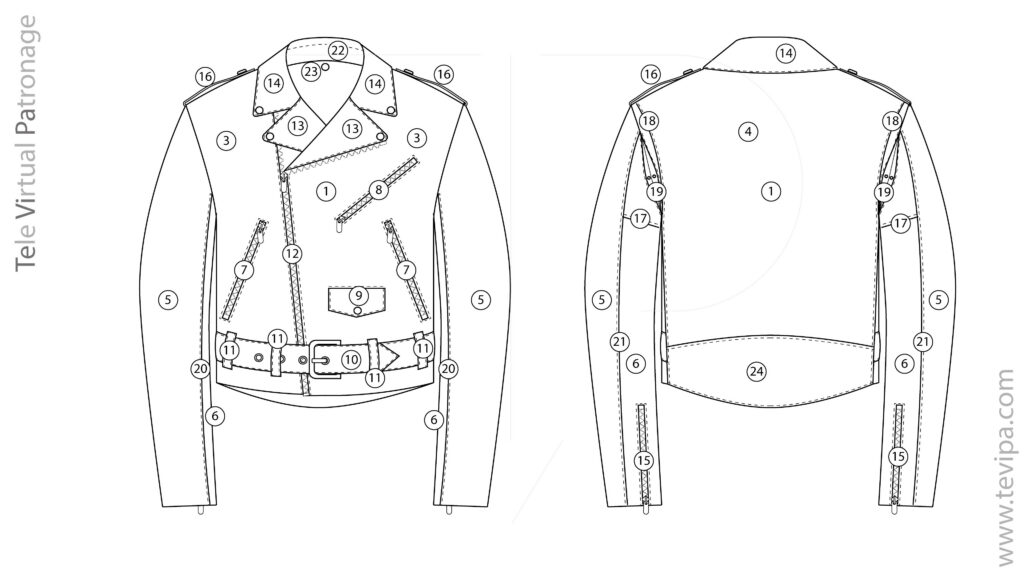
- 1.- Centre front axis
- 2.- Centre back axis
- 3.- Front piece
- 4.- Back piece
- 5.- Upper sleeve piece
- 6.- Under sleeve piece
- 7.- Slanted side pocket
- 8.- Slanted chest pocket
- 9.- Ticket pocket
- 10.- Belt (front piece)
- 11.- Belt loops
- 12.- Diagonal zipper
- 13.- Lapels
- 14.- Convertible collar
- 15.- Sleeve hem opening with zipper
- 16.- Epaulette with snap fastening
- 17.- Axillary panel seam
- 18.- Back panel pleat
- 19.- Armhole gusset
- 20.- Blood seam or bleed seam
- 21.- Elbow seam
- 22.- Topstitching of the false collar stand
- 23.- Snap fastening for the detachable collar
- 24.- Kidney back panel
Technical ease: original biker jackets work with ease 1 or, at most, ease 2 (as we saw in the post about ease in the jacket block).
Rigid leather must not “bag” air; the garment must impose itself on the body out of technical necessity, not merely for aesthetic reasons.
The biker jacket is a kind of armour.
To draft the base pattern, see: Casual Jacket Block – Drafting
To apply the appropriate ease to the pattern: Ease and grading of the casual jacket
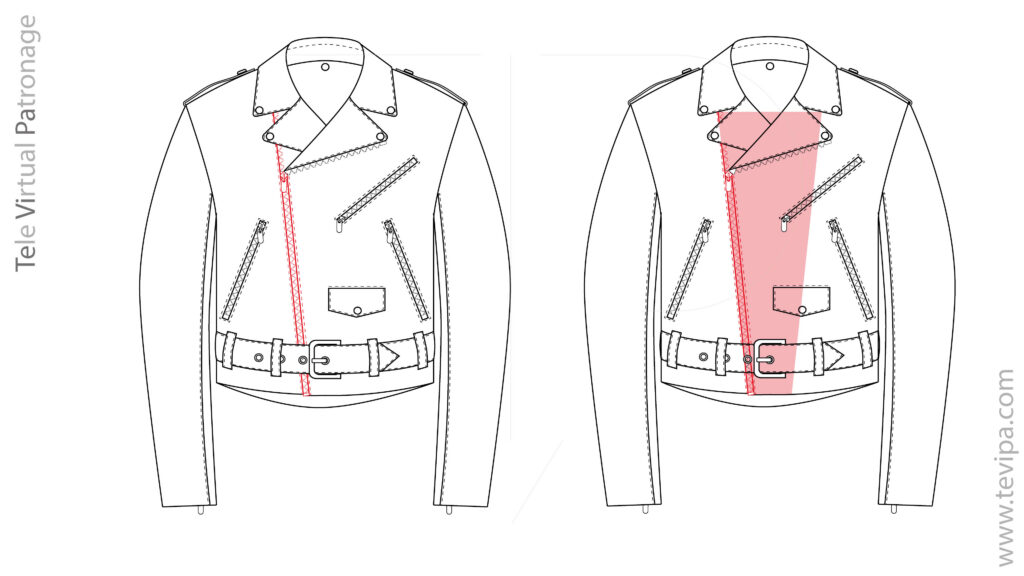
1 – Asymmetrical Front
The displaced zipper creates an overlap across the chest, generating a double layer of leather that acts as a thermal shield.
The displaced zipper creates an overlap across the chest, generating a double layer of leather that acts as a thermal shield.
In a standard size — for example, a size 50 — the usual overlap at the lower part of the garment measures between 6 and 8 centimetres.
Below six centimetres, it loses character and looks weak; above 8 centimetres, it begins to appear oversized.
The overlap at the upper part measures between 10 and 12 centimetres.
To transfer these proportions to any size, we can relate them to the half chest circumference. In this way:
– The lower overlap represents approximately between 12% and 16% of the half chest circumference.
– The upper overlap ranges from 20% to 24% of that same measurement.

We begin from the four-piece jacket block, in this case a size 50 for a height of 174 cm.
We extend the centre front line towards the collar point.
By doing so, the distance increases between the intersection of the armhole line with the centre front and the lowest point of the neckline.
This increase is caused by the inclination of the Louis line.
We place the width of the lower overlap on both sides of the centre front line, at the hem level.
Next, we position half of the upper overlap on the projection of the centre front axis over the lowest point of the neckline, repeating the same criterion used at the hem.
We draft an isosceles trapezoid whose axis of symmetry coincides with the centre front line (left figure).
This shape defines the development of the overlap.
We duplicate this piece symmetrically.
The front on the wearer’s left side remains as a single piece.
The front on the wearer’s right side is divided following the inner side of the trapezoid.
Since this side does not reach the neckline, we extend its inclination until it reaches it.
At the upper point of this line, corresponding to its meeting with the neckline, we mark a notch on both pieces.
This division allows the zipper to be inserted, running from the notch down to the hem of the jacket.
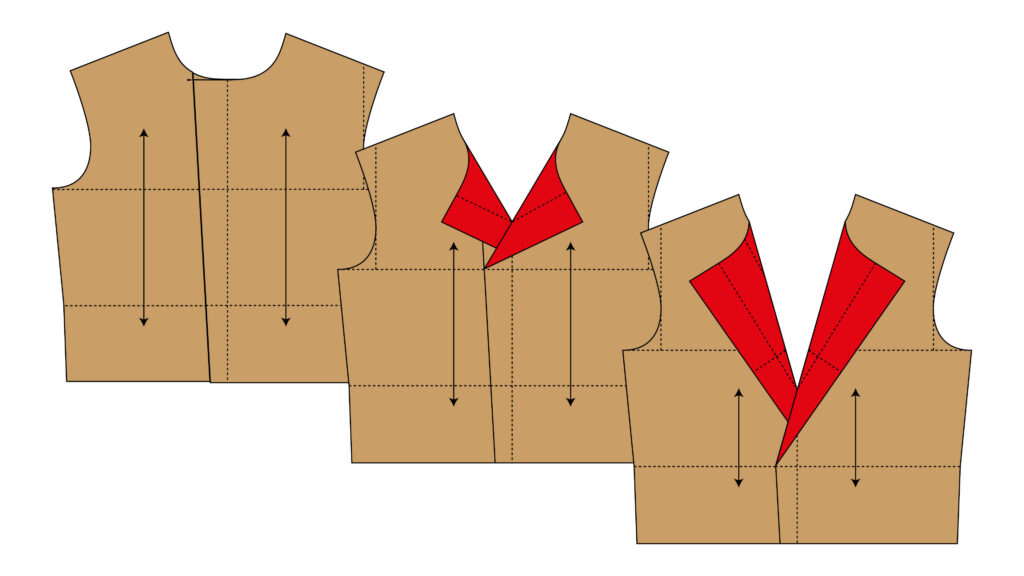
If we fully close the zipper, we obtain a close-fitting collar. When we open it, the lapels appear.
The greater the opening, the greater the development of the lapels, both in length and width.
In the closed position, the pieces overlap at the base of the collar, generating a double layer on each side. The whole assembly forms four layers of leather acting as effective thermal protection.
2 – The Biker Collar
2a – The Convertible Collar
Although visually it resembles a tailored collar with a stand and fall, in the original 618 it is cut from a single piece of leather with a horizontal topstitch placed approximately 3.5–4 cm from the base in order to create the break line.
This technique is widely used in leatherwork to avoid the excessive bulk of seams in thick leather.

Drafting the one-piece convertible collar
2b – Stabilising Rivets
Positioned at the collar and lapel points to prevent flapping in the wind.
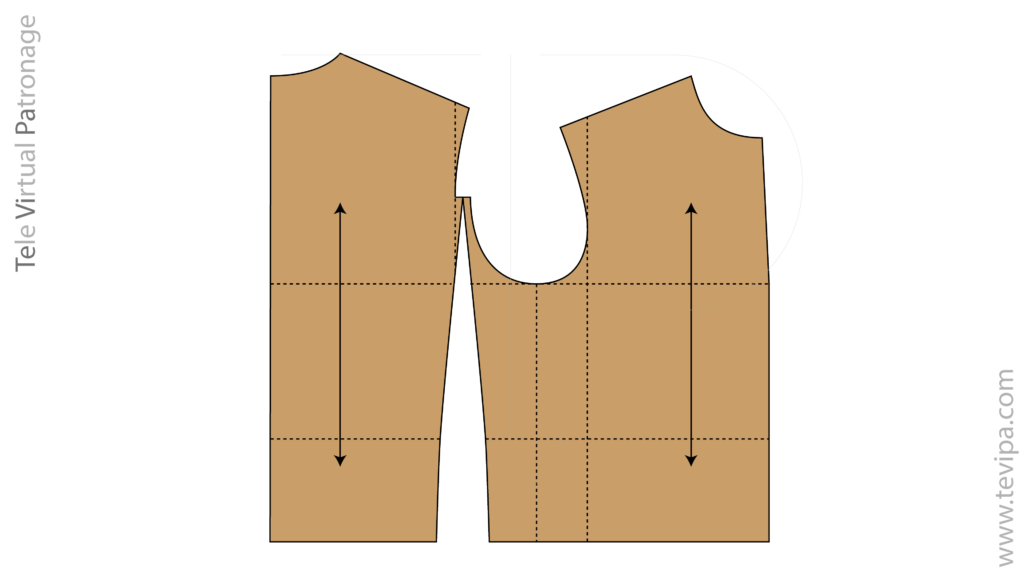
3 – Displaced Side Panel
Compared to the jacket block, the side seam is moved backwards to the side panel line in order to improve ergonomics.

In most cutting systems from the early twentieth century, upper garments were cut in two pieces: the back and the front.
The back piece corresponds to the current back piece of a three-piece upper garment (back, side panel, and front).
In these cases, the front included what are now the side panel and the front pieces.
The shaping of the front piece was achieved through a dart running from the front part of the armhole towards the front edge of the side pocket.
This dart is known as the underarm or axillary dart.
Extending this dart down to the hem gave rise to a new piece: the side panel.
The side panel is not the origin, but rather an evolution — a way of redistributing that volume into a new piece in order to improve body control.
The Sack Suit was the first mass-produced suit in the United States, introduced by Brooks Brothers at the end of the nineteenth century, around 1895.
It received this name because the jacket hangs straight from the shoulders, like a sack or bag, instead of being shaped closely to the body like European suits.
The old American cut is characterised by:
- Absence of front darts (no darts): this is the key technical feature. While most modern jackets use vertical seams (darts) to shape the waist, the sack cut has none, giving it a “boxy” silhouette.
- Natural shoulders: the shoulders either have no padding or very little structure, following the body’s natural fall.
- Back cut: the name also derives from the French term sacque, referring to a back formed from two straight panels instead of four curved fitted panels.
When Brooks Brothers introduced the Sack Suit, tailors used this term — or its anglicised derivative Sack — to distinguish it from the European “fitted” cut.
Without shaping seams: like the French sacque dress, the American jacket had no front darts.
“U” shape: in French, the term was sometimes used to describe a back cut from two straight panels forming a sack-like silhouette, instead of the four curved panels of traditional tailoring that sought the “hourglass” shape.
- Buttons (3-roll-2): many of these garments have three buttons, but they are designed so that the lapel rolls over the top button, hiding it and leaving only the middle button functional.
- Cultural and Historical Importance of the Sack Suit System
- The “Great Equaliser”: because it was a loose cut that did not require millimetric adjustments, it adapted to almost any body type. This allowed it to become the first ready-to-wear garment accessible to the middle and working classes.
- Ivy League Style: during the 1920s and again in the 1950s and 1960s, it became the uniform of elite American universities such as Yale and Harvard, forming the foundation of the Preppy or Ivy League style.
- Evolution into the “American Jacket”: when this style arrived in Spain and other countries, it began to be called simply the “American jacket,” a term we still use today to distinguish it from more structured or European jackets.
- https://archive.org/details/newstandardcoats00jnoj/page/102/mode/2up
- https://archive.org/details/newstandardcoats00jnoj/page/138/mode/2up
This inheritance from the late nineteenth-century American cut — which prioritised the two-piece structure for its versatility and ease of manufacture — is what Irving Schott inherited for his Perfecto model.
By keeping the side panel joined to the front, the jacket not only retained the boxy and democratic spirit of the Sack Suit, but also gained structural resistance by eliminating unnecessary seams in a garment intended for protection.
The biker jacket inherits this cutting logic from the Sack Suit, with which it is contemporary.
To adapt our jacket block into a biker pattern:
Below we reproduce the two-piece jacket body block.
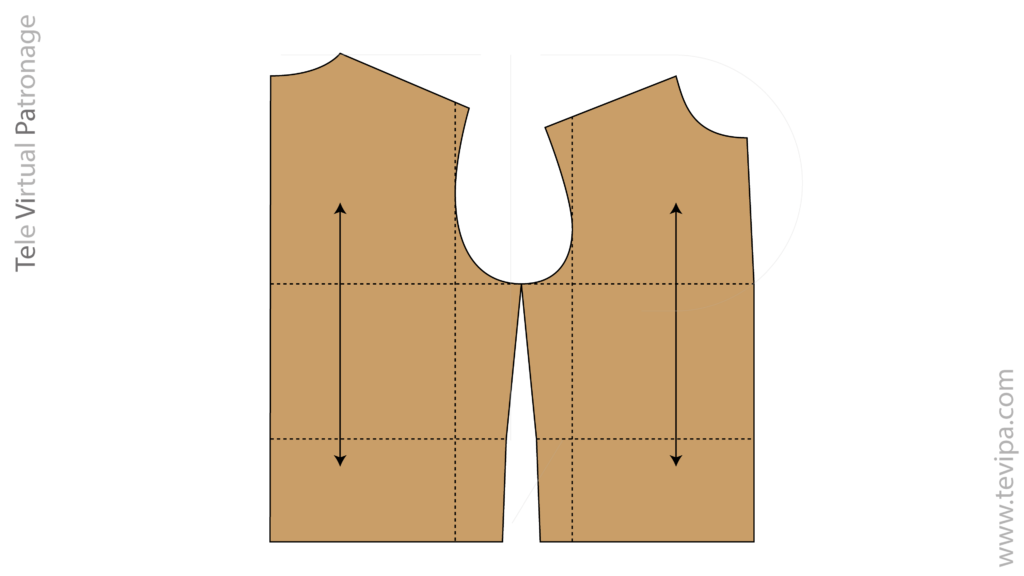
We will transfer the side shaping dart onto the side panel construction line.
At the point of inflection of the back armhole on the side panel construction line, we will mark one centimetre towards the back and one centimetre towards the front.
These centimetres will become the armhole heels of the body.
From the ends of these armhole heels, we will draft the new dart.
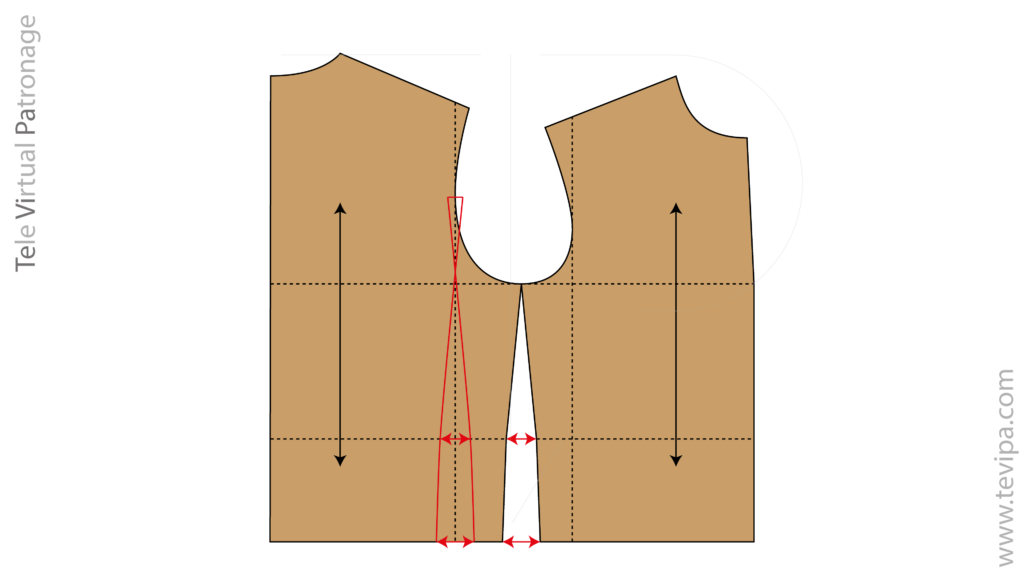
The final shape of the body pieces after the transformation is as follows:
4 – Pockets: Ergonomics and Dynamics
Beyond their iconic aesthetic, the arrangement of the pockets on the biker jacket responds to principles of applied anthropometry.
They are not designed for a static body, but for a user in a dynamic posture — seated, with the arms on the handlebars.
Because they are integrated into the large front block that wraps around the side of the body, these elements take advantage of the absence of rigid seams in order to provide superior tactile accessibility.
4.1 – Slanted Pockets
Three diagonal zip pockets for natural access while riding.
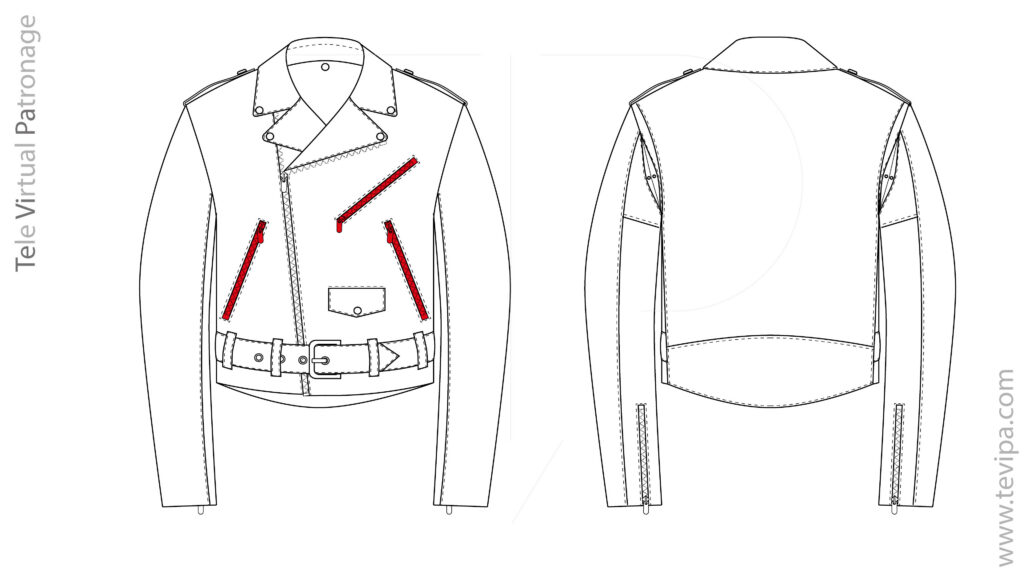
The angle of these pockets represents the ultimate example of functional cutting.
Their diagonal inclination is not arbitrary: it follows the natural axis of the forearm when the elbows are bent towards the handlebars.
- Cross access: the chest pocket — historically known as the map pocket — is oriented so that the opposite hand can enter it naturally, without forcing the rider to strain the shoulder or lose balance.
- Armhole comfort: because they are positioned on the panel joining the front and the side panel, the pockets avoid areas of maximum structural tension. This allows them, even when full, not to compress the rider’s torso when leaning over the motorcycle tank, guaranteeing complete freedom of movement.
4.2 – “Ticket” Pocket
Small pocket with flap and horizontal snap fastening at waist level.
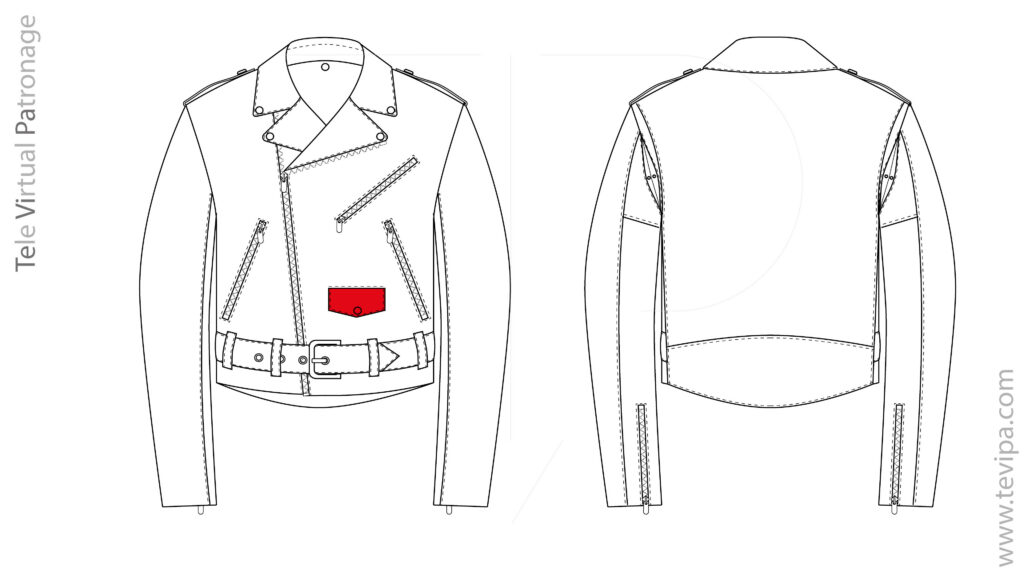
This small pocket with a flap and snap button, traditionally positioned on the left front side, is a key element of detailed ergonomics.
- Strategic placement: it is located in an anthropometric “valley,” where hip flexion while seated does not crush the contents.
- Specific functionality: its design allows coins for tolls or small tickets to be stored safely and accessibly. Because it is separated from the main cargo pockets, it prevents small objects from getting lost or becoming unreachable while wearing gloves, reinforcing the concept of a “technical second skin” that defines the Perfecto.
If we apply the side panel displacement to the front of the jacket block, transform the centre front into an asymmetrical front, and add seam allowances both to the centre front and to the new cut created on the left front, we obtain the following three pieces:
For a European size 50 — corresponding approximately to a 40/42 chest size — the map pocket (the upper slanted pocket) follows standard dimensions that seek a balance between allowing the hand to fit comfortably (with or without a thin glove) while avoiding intrusion into the armhole or lapel area.
- – Opening length (zipper): between 13 cm and 14.5 cm.
- Note: below 13 cm, inserting the hand becomes difficult; above 15 cm, the pocket begins to appear disproportionate on the chest.
- – Inclination (angle): usually between 55° and 65° relative to the waist line (equivalent to approximately 25°–35° relative to the centre front axis). This inclination responds to the ergonomics of hand insertion through cross access while riding.
- – Pocket bag depth: usually between 12 cm and 15 cm deep downward. The pocket bag is not normally a perfect rectangle; instead, it slightly follows the shape of the chest to avoid discomfort.
Position of the Map Pocket on the Pattern
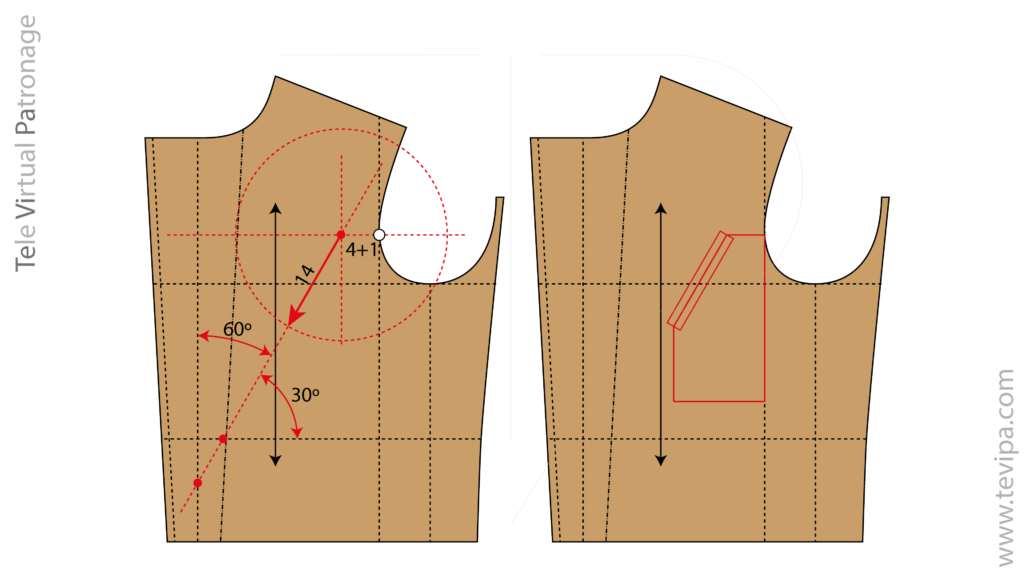
- – Distance from the shoulder: the upper start of the zipper is usually positioned at the level of the inflection point where the armhole meets the side panel construction line.
- – Relationship with the armhole: sufficient space must remain — at least 3 to 4 cm — between the pocket and the armhole seam so that, when the arm moves forward (as the back pleat expands), the pocket does not suffer excessive tension capable of tearing the leather or damaging the zipper. Remember that before taking these measurements we must subtract the seam allowances, since the jacket drafting includes a 1 cm seam allowance.
If you are going to use heavy zippers (size 8 or 10), add an extra 0.5 cm allowance to the pocket opening so that the zipper slider does not catch when opening and closing, especially in this slanted position.
Generally, size 8 or size 10 zippers are used for this type of jacket. The closed teeth — that is, the width of the zipper chain — will measure approximately 0.8 cm or 1 cm. Therefore, the rectangle intended to house the zipper will measure around 2 cm.
Position of the Side Pockets
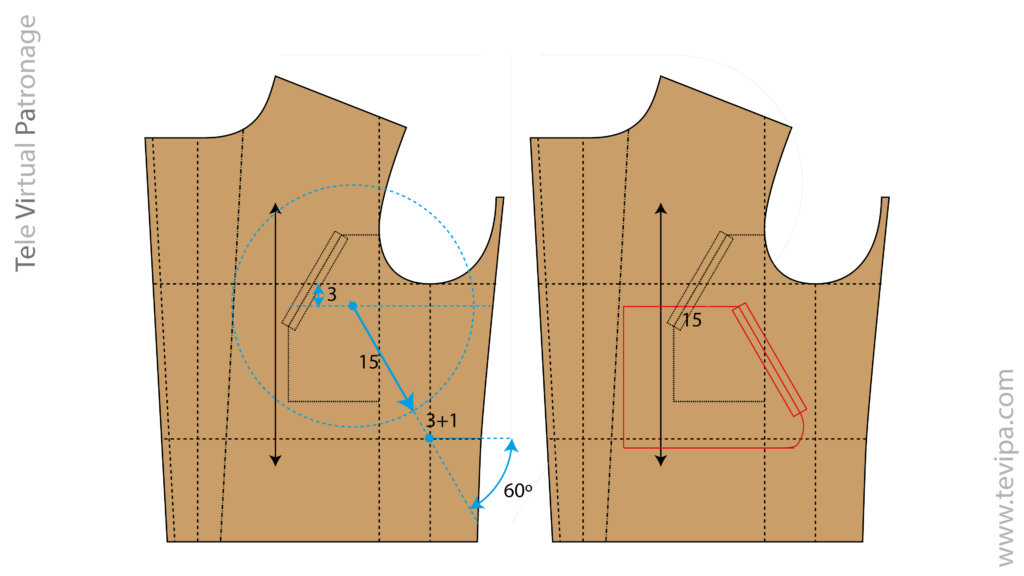
It is imperative to position the end of the cargo pockets with a safety margin of 3 centimetres above the waist construction line.
This reserved space is critical for the later integration of the front belt and its loops — a development we will analyse in depth later on, but which already conditions the verticality and path of the zippers from this stage onward.
Below are the drafting references for the side cargo pockets:
1 Axis of Inclination and Opening
- Opening: in a size 50, the zipper should measure between 15 cm and 16.5 cm. It is longer than the chest pocket zipper because the hand enters more deeply and directly.
- Angle: between 65° and 75° relative to the horizontal. It must be more vertical than the chest pocket so that objects fall by gravity towards the bottom of the pocket bag and do not slip out if the zipper is left open.
2 Positioning Coordinates
- Upper starting point
- Measure approximately 3 to 4 cm downward from the armhole line.
- From the side seam — the seam joining the front and the displaced side panel — move approximately 3 cm towards the centre, plus 1 cm for the seam allowance.
- Lower end point
- It is positioned above the inclined line that begins at the waist and passes through the intersection of the half-armhole line with the waist line.
3 The Cargo or Side Pocket Bag
- Width: approximately 15 cm.
- Depth: it should reach the waist or extend no more than 1.5 cm below it.
- Ergonomic shape: the shape should not be rectangular; it is preferable to make it trapezoidal in order to maximise the use of the centre area of the jacket.
4 – The Ticket Pocket
It is located on the left side of the garment. The point of the ticket pocket flap is aligned at the same height as the end of the side cargo pocket.
Between the ticket pocket and the side cargo pocket there is a space greater than 2 centimetres.

Finished Flap Dimensions
- Upper width: 10 cm.
- Side drop (height at the ends): 3.5 cm.
- Central drop (point tip): 5 cm. The snap button will be centred 1.5 cm from the lower edge of the point.
5 – Positioning
- Vertical axis: aligned with the lower point of the map pocket.
- Horizontal axis: the point of the ticket pocket flap is aligned with the lower point of the side cargo pocket.
The fronts with the marked pockets will have the following shape:

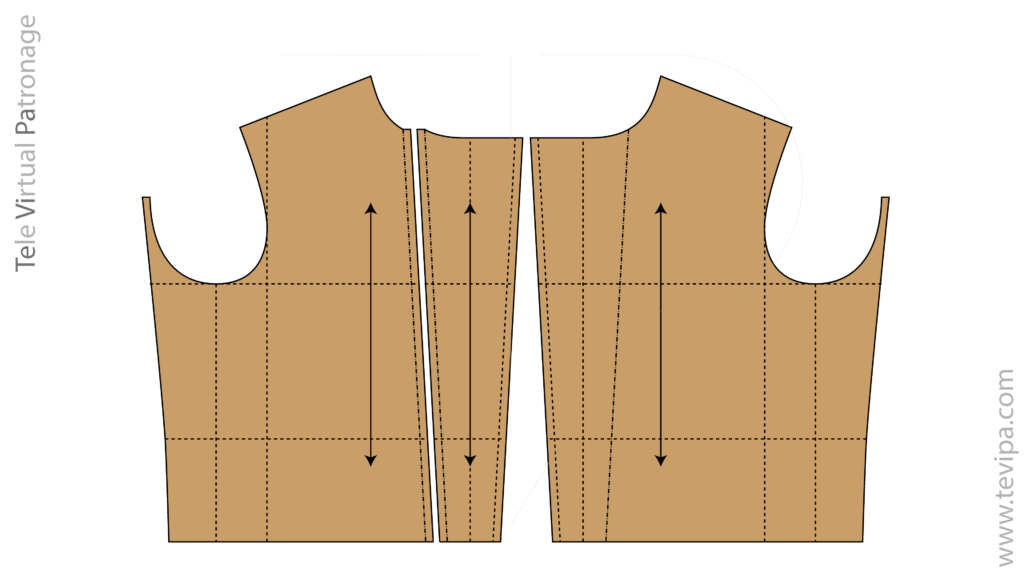
3 – Two-Piece Tailored Sleeve (Upper Sleeve and Under Sleeve)
In order to give the arm its curved shape, it is necessary to use a two-piece sleeve.
At the cuff we find an opening that closes by means of a zipper. This type of sleeve hem allows the sleeve to be worn over gloves while blocking air entry.
When Irving Schott designed the Perfecto in 1928, the armhole was already a technically resolved element.
The great contribution of the Perfecto was not the invention of the two-piece sleeve, but rather taking the sophisticated tailored sleeve (elbow sleeve) and placing it at the service of riding.
By using a two-piece construction (upper sleeve and under sleeve), the jacket inherits from high tailoring the ability to pre-curve the arm — something vital when working with a material as rigid and with as little elasticity as leather.
3.1 – Sleeve Pitch
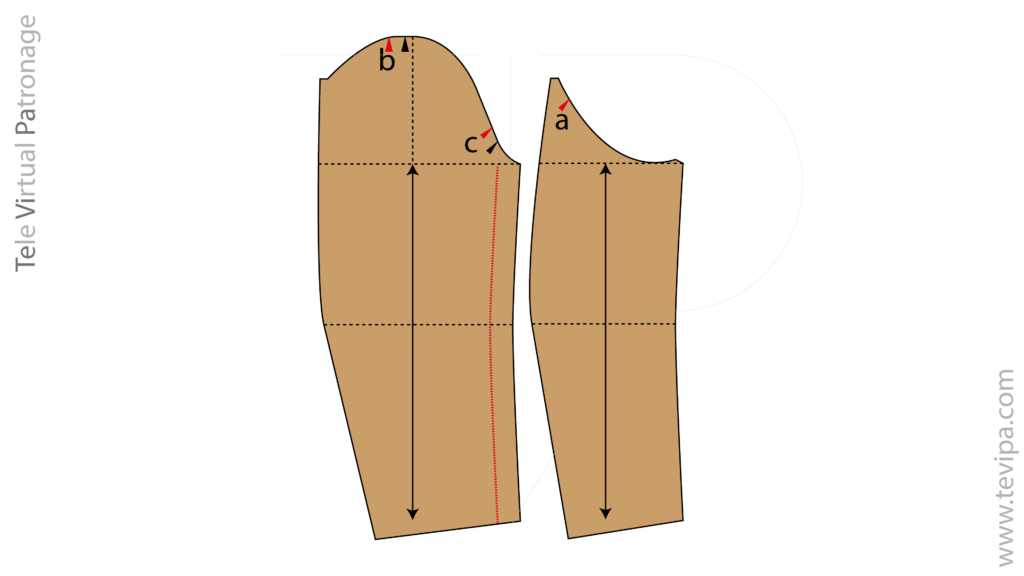
However, the point of genius that separates it from a conventional street jacket lies in the backward displacement of the notches — what Americans call the “sleeve pitch.”
- – Forward sleeve orientation (Sleeve Rotation): in the biker pattern, the assembly notches are shifted backwards. This causes the sleeve to orient naturally towards the handlebars. While a street jacket seeks sleeve verticality in order to favour aesthetics in a resting position, the biker jacket seeks a riding attack position in which the arm naturally rests forward.
- – Riding Ergonomics: this forward orientation reduces the resistance generated by the garment itself — especially when working with rigid leathers such as horsehide — allowing the arm to reach the handlebars without fighting against the jacket.
- – The Rider’s Aesthetic: this technical decision has a direct visual consequence: off the motorcycle, the sleeve may appear “forced” or show wrinkles when at rest. This is the price of a purely technical garment: it is less comfortable and less elegant for walking, but perfect for riding.
- – The volume of the under sleeve is reduced to the minimum in order to avoid bulk at the inner elbow angle.
- – Thermal adjustment is resolved at the cuff through the zipper, allowing the sleeve to close over the glove and block air entry.
3.2 – Displacement of the Blood Line
During the first decades of the twentieth century, one of the most widespread cutting systems in America — the Mitchell method — proposed shifting the blood line towards the inside of the sleeve, usually between 1.5 and 2.5 cm, in workwear or sports garments.
This displacement prevents the seam from coinciding with the cubital hollow area, where friction concentrates when the arm is flexed, improving both comfort and garment durability.
From an aesthetic point of view, it also cleans the sleeve visually by hiding the seam in the front view.
In the previous image, we showed the position of the notches on the base pattern.
We also marked the blood line in red to show the displacement of the seam.
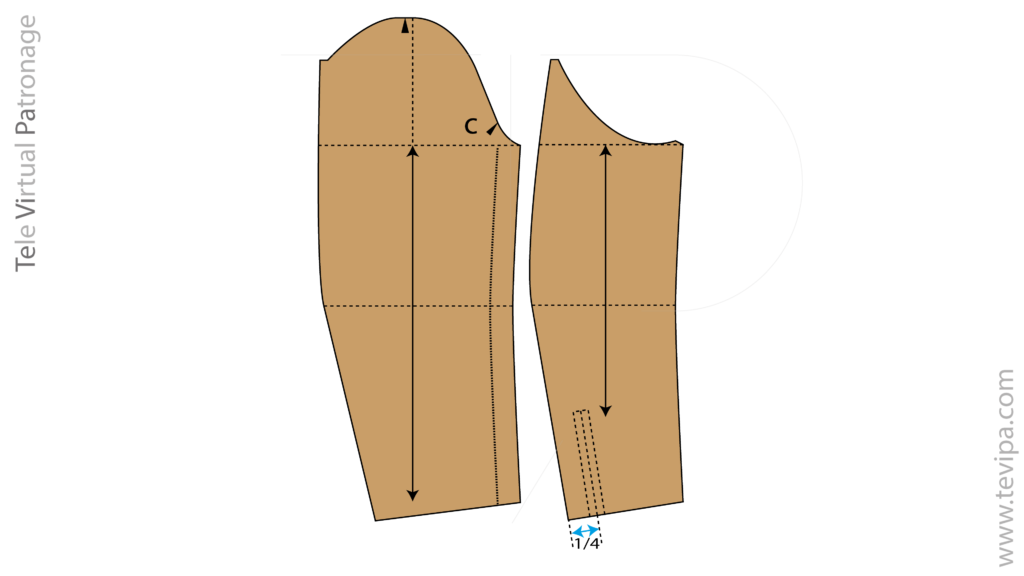
In the following image, we show in red the rotation of the notches used to advance the sleeve.
3.3 – The Sleeve Hem Zipper
The sleeve hem zipper is not a decorative feature, but a functional solution inherited from riding garments. Its mission is twofold: to allow the hand to pass through a narrow cuff and, once closed, to ensure cuff adjustment in order to block air entry.
It is positioned along the under sleeve seam, generally on the under sleeve piece, extending the opening upward from the cuff edge. Its placement is not arbitrary: it must be located in the least visible resting area while remaining accessible in use, avoiding interference with both the palm and the back of the hand.
The zipper length usually ranges between 13 and 15 cm, although it may vary slightly depending on cuff diameter and material thickness. In rigid leathers or very tight cuffs, it is advisable to approach the upper range; in softer materials or cuffs with greater ease, it may be shortened without compromising functionality.
As for zipper type, metal zippers are used because of their resistance and stability in heavy materials such as leather. The most suitable gauge is size 8, which offers an optimal balance between robustness and flexibility. Size 10, although more forceful, becomes excessive for this application: it adds unnecessary rigidity and compromises the clean appearance of the cuff.
The cuff design and zipper length must be understood as a system: the narrower the cuff width, the greater the need for opening. A correctly dimensioned zipper allows a clean, fitted cuff to be maintained without sacrificing usability.
4 – Expansion Systems: Riding Gussets
The true engineering of the biker jacket lies in its ability to transform itself: it must be a fitted and protective garment at rest, yet expand while in the riding position.
To achieve this full range of movement without adding excessive fabric that flaps in the wind, two types of gussets working in harmony are used.
4.1 – The Back Side Gusset (Action Back)
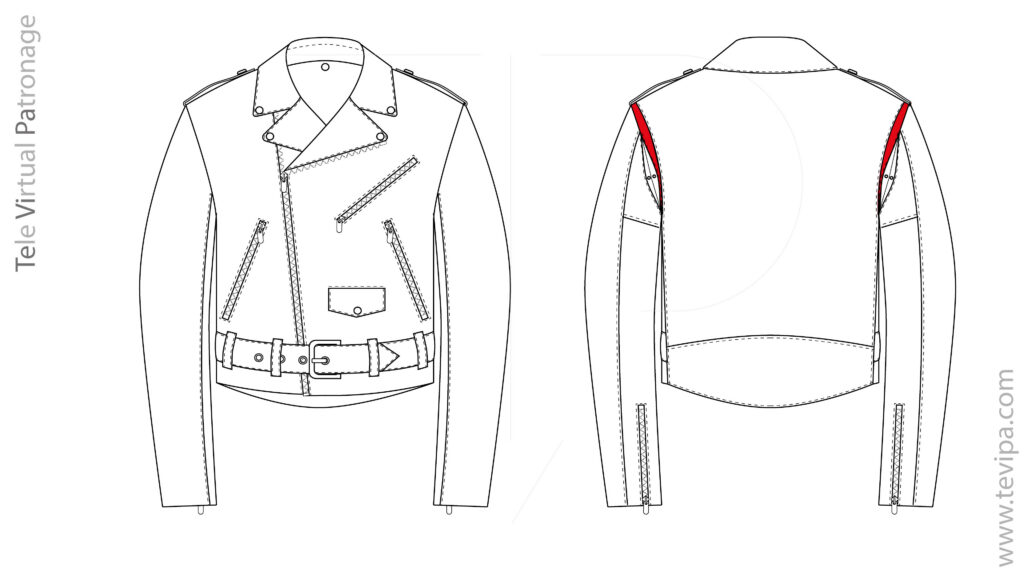
The back side gusset is positioned along the sides of the back piece.
It is a pleat with a depth of 4 to 5 cm. It begins approximately 1.5 to 2 cm above the shoulder seam, before the point where the shoulder meets the armhole.
It ends at the upper part of the side seam, shortly before the kidney panel.
This pleat allows the arms to project forward without blocking the back.
The gusset underlay may be made of leather or technical stretch fabric.
This pleat is responsible for absorbing longitudinal tension.
- Mechanics: when the rider projects the arms forward, the gusset opens, providing the additional width required so that the back does not lock.
- Relationship with the pattern: because it is integrated into the back piece, it allows the front — which, as we have seen, already includes the side panel — to remain stable while the back section “grows.”
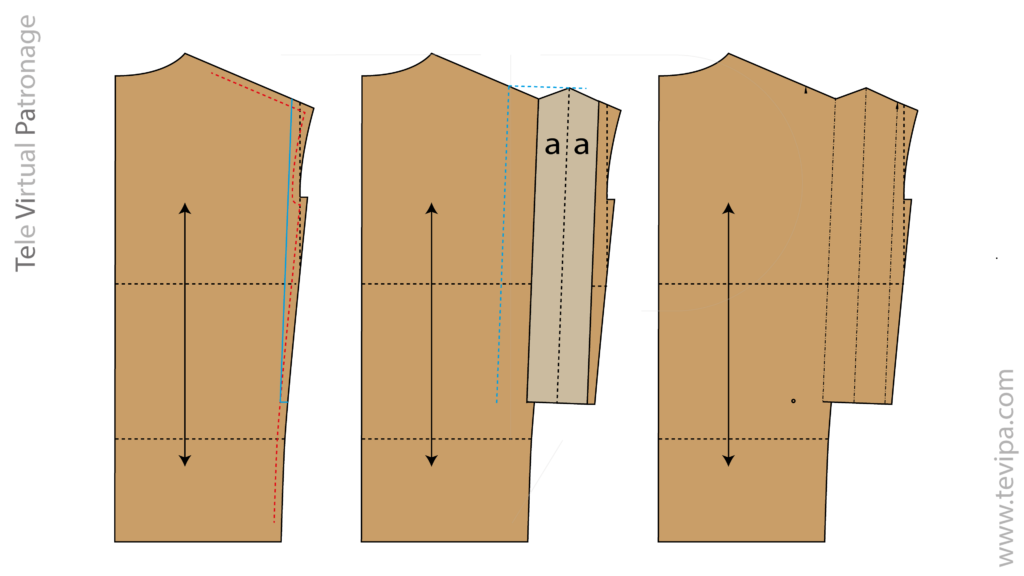
To draft this pleat, we must first subtract the seam allowance from the area affected by the gusset on the back piece (left image, red dashed line).
We then draw the position where we want the pleat, keeping in mind that the finished garment will end at the dashed line.
Once the gusset line has been decided, we open the back piece along the gusset line and insert the corresponding section.
The gusset depth should not exceed 5 cm (centre image).
We then regulate the upper part of the gusset and draft the line of the folded gusset underlay, marking the notches for the finished pleat depth and for the start of the gusset at the shoulder seam (right image).
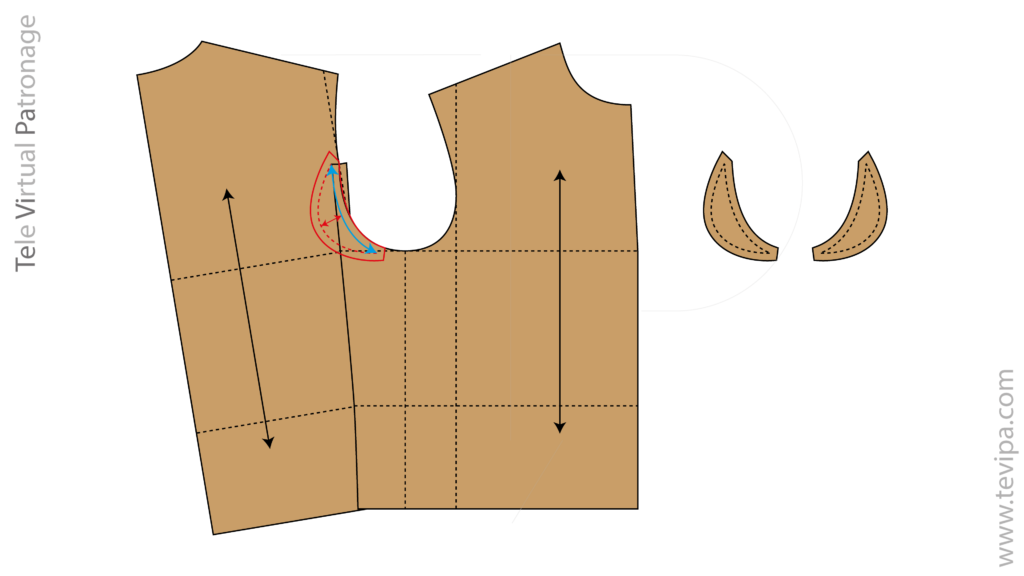
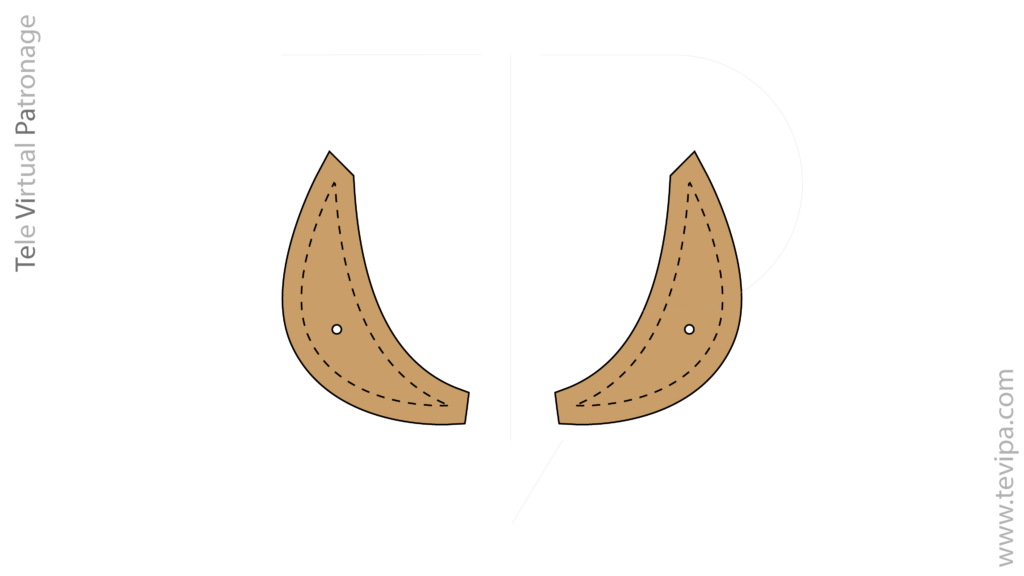
4.2 – Armhole Gusset
An independent crescent-shaped piece positioned in the armhole. It adds extra vertical travel so that the jacket does not ride upward when the arms are raised.

It is an independent piece inserted into the lower armhole when attaching the sleeve to the body.
- – The Ergonomic Pivot: its function is to disconnect arm movement from the body of the jacket. Without this gusset, raising or rotating the arm would pull the entire side of the jacket upward through the armhole seam.
- – Connection with the Sleeve: this gusset directly “feeds” the armhole seam and meets the lower sleeve piece (the under sleeve). It is the critical point where back expansion and arm articulation meet, allowing the two-piece sleeve to rotate freely without deforming the rest of the garment.
Technical conclusion: both gussets allow the jacket to transition from a static state to a dynamic one.
While the back gusset frees the shoulder blade, the armhole gusset frees the shoulder joint complex.
Together, they provide the maximum ergonomic development required by the motorcycle riding position.
The width usually ranges from 2.5 to 4 cm at the widest part of the gousset (red arrow), while its length is approximately 12 to 18 cm (blue arrow).
Essentially, the gusset acts as a bridge joining the sleeve and the body. It allows the jacket to open only where necessary — at the joint. Everywhere else, the structure remains stable..
4.3 – Ventilation Eyelets

Inside the armhole gusset, 2 to 3 metal eyelets are placed to evacuate body heat in such a sealed garment.
Within the complexity of the armhole gusset, we find a small but vital technical detail: the metal eyelets. These are not placed for aesthetic reasons, but to solve a physical problem derived from the use of heavy technical materials.
- – Active Thermoregulation: leather is an insulating and poorly breathable material. Positioned directly in the armpit — the point of greatest concentration of body heat — these eyelets allow water vapour to escape and air to enter.
- – The Air “Pump”: due to the dynamic riding posture and the movement of the arms while riding, the armhole gusset literally acts like a bellows. As it opens and closes with arm movement, it “pumps” air through the eyelets, forcing air circulation inside the jacket without needing to open the main zipper and compromise safety.
- – Material Durability: by allowing moisture evacuation in a critical area, the eyelets also help preserve the leather and the inner lining, preventing sweat from degrading the fibres and the under sleeve seams over time.
5 – Lumbar Stabilisation: Clean Back, Kidney Panel, Front Belt and Total Length
If the front and sleeves are designed for action, the lower back section is designed for protection and stability. In the Perfecto, the architecture of this area moves away from civilian tailoring in order to fulfil a protective function.
5.1 – Back Without Yoke
The back piece is kept clean so as not to interfere with the work of the gussets.
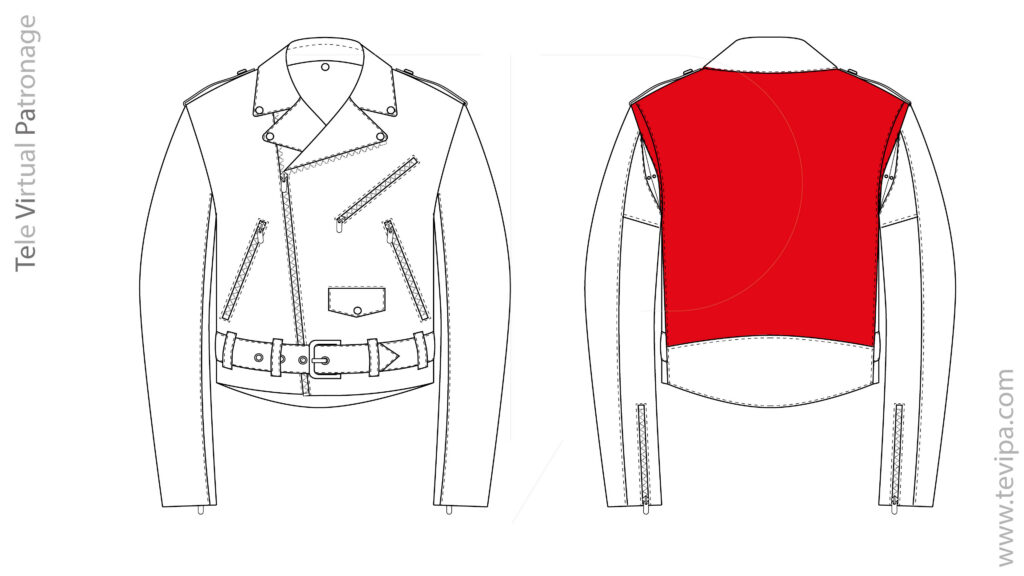
Unlike work jackets or shirts, the original biker jacket generally dispenses with the yoke. This transforms the back into a continuous and resistant surface, minimising seams that could burst in the event of sliding across asphalt.
5.2 – Kidney Panel
A lumbar reinforcement that keeps the kidney area protected when the body leans forward.
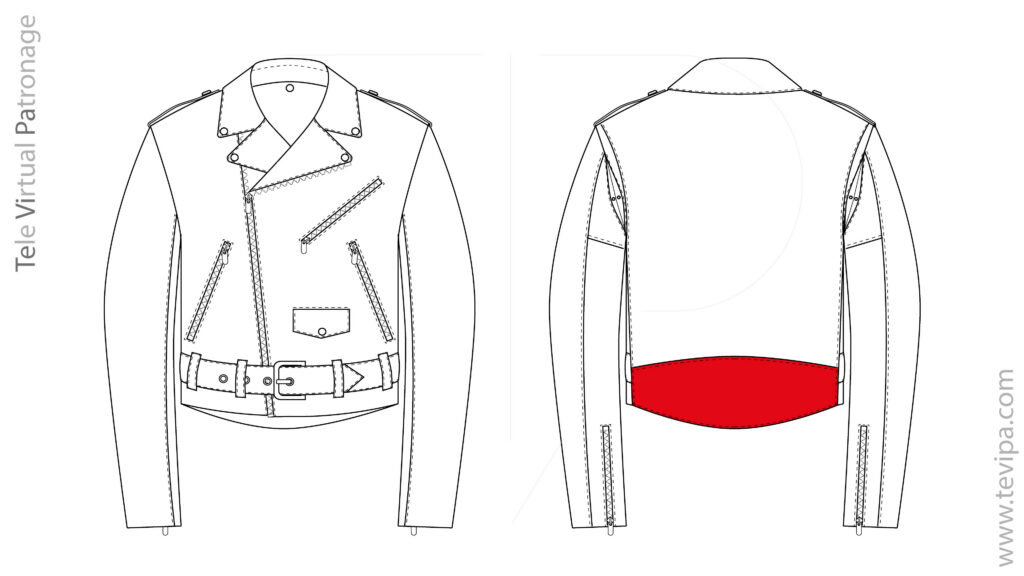
At the base of the back we find a reinforced horizontal panel that descends slightly lower than the front.
Its function is twofold: it protects the lumbar area from wind and cold while riding, and stabilises the garment by preventing lateral displacement.
5.3 – Integrated Front Belt
A half front belt that secures the hem and blocks air entry in the lumbar area.
The system culminates in the belt, whose position is crucial for the balance of the garment.
Anchor Point: the belt is positioned exactly at the midpoint of the kidney panel, coinciding with the wearer’s anatomical waist. Because it is integrated into the front pieces — which, as we have already seen, also integrate the side panel — the belt allows the structure to “close” against the body.
Volume Control: its function is not merely aesthetic. By tightening the belt, the rider fixes the jacket to the body’s centre of gravity. This prevents the weight of the leather and protective elements from “floating” or shifting, and stops air from entering through the lower part at high speed, sealing the garment and transforming it into a stable aerodynamic block.
5.4 – Breakdown of the Front Belt and Kidney Panel Pieces
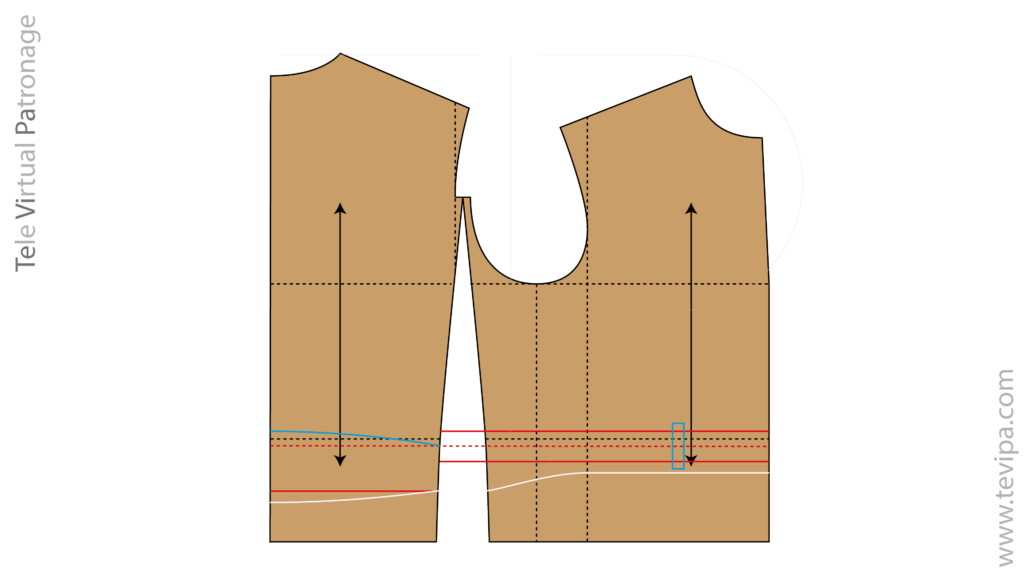
The kidney panel is defined based on the position of the front belt.
The positioning of the belt also determines the hem of the front.
We begin by fixing the belt position.
In our example, we will calculate a belt width of 4 centimetres.
The centre of the belt is positioned 1 cm below the actual waist, as mentioned previously in the section on side pockets.
In the previous image, the belt centre was represented with a red dashed line. This line appears both on the front and on the back.
On the front piece, we draft two lines parallel to the belt axis, separated by the width of the belt itself — in our case, 2 centimetres on each side. This defines the space occupied by the belt on the front piece.
Halfway between the side panel advance line and the centre front line, we place the centre of the belt loop.
The loop will have a length equal to the width of the belt plus a couple of centimetres, and a width equal to one third of its finished width. In other words, the finished loops will measure 6 cm by 1.5 cm.
On the back piece, we mark with notches on the side seam the position corresponding to the front belt.
The next step consists of defining the upper cut of the kidney panel on the back piece.
This cut begins at the side seam, at the level of the belt centre (red dashed line), and ends at the centre back seam, at the level of the upper notch marking the belt position.
On the front piece, we draw a line 1.5 cm below the line marking the lower edge of the belt, from the centre front to the side panel advance line.
This line forms part of the front hem (white continuous line).
On the side seam, we mark a point at a distance equal to the width of the belt measured downward from the lower belt line.
We connect this point to the previously drafted hem line using a curved line.
The lower point of the front hem seam is then transferred to the side seam of the back. We calculate another point 1.5 cm lower along the centre back seam.
These last two points are connected with a curved line. This line forms the lower edge of the back kidney panel and simultaneously the hem of the back section.
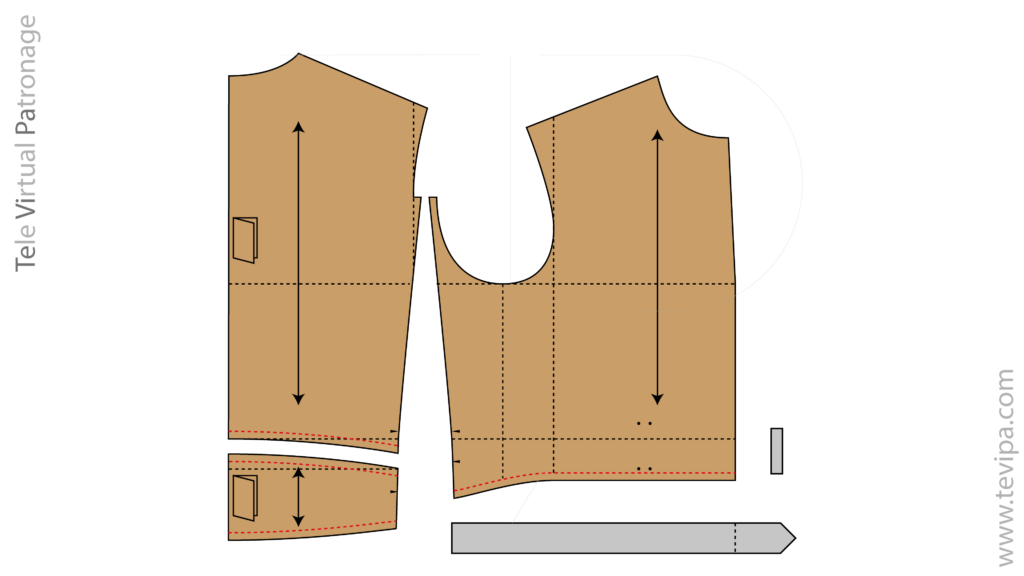
In the previous image, we showed the pieces cut at the hem and the kidney panel separated.
We also positioned the loop drill holes and the notches required for the placement of the front belt.
The belt and loops were intentionally left undeveloped; to indicate this, they were filled in grey.
Throughout this entire post, we have maintained the grainlines, despite analysing a leather biker jacket.
We kept them because everything explained so far — the transformations of the base pattern, which are the real purpose of this post — applies equally to leather garments and fabric garments.
In the case of loops and belts made from leather, some of the seam allowances normally marked for these pieces become unnecessary.
The development of a belt and belt loop is elementary, so we do not wish to extend this post unnecessarily.
6 – Epaulettes
Epaulettes are strips positioned on the shoulders and fastened near the collar with a snap fastening (the 613 model includes the famous star).
Originally, epaulettes were not decorative elements; they responded to a functional and military purpose.
Original Practical Functions
- – Holding straps and parts of equipment such as shoulder straps, backpacks, or holsters. They prevent straps from slipping off the shoulder.
- – Military rank identification, for example stripes or insignia.
- – Allowing objects to be secured in extreme conditions, such as capes, blankets, or even gloves in certain cases.
In the biker jacket, epaulettes are not arbitrary: they help stabilise straps on the shoulder, such as a shoulder bag or a hanging helmet. They also reinforce the upper area.
In reality, they are not structural elements and do not directly affect the garment’s performance, unlike other elements such as the gussets, the two-piece sleeve, or the belt.
Today, they function primarily as an aesthetic marker inherited from military garments: they reinforce the visual language and connect with concepts of uniformity, authority, and protection.
From an aesthetic point of view, they balance the relationship between the shoulder and the lapel.
The epaulettes should have a width of 4 to 5 cm; we may establish the same width as the belt.
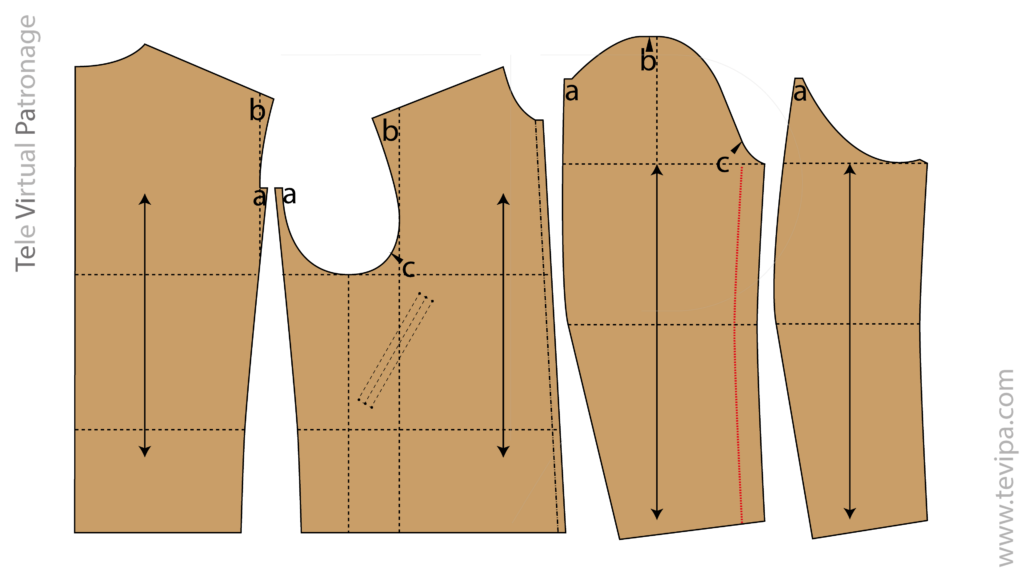
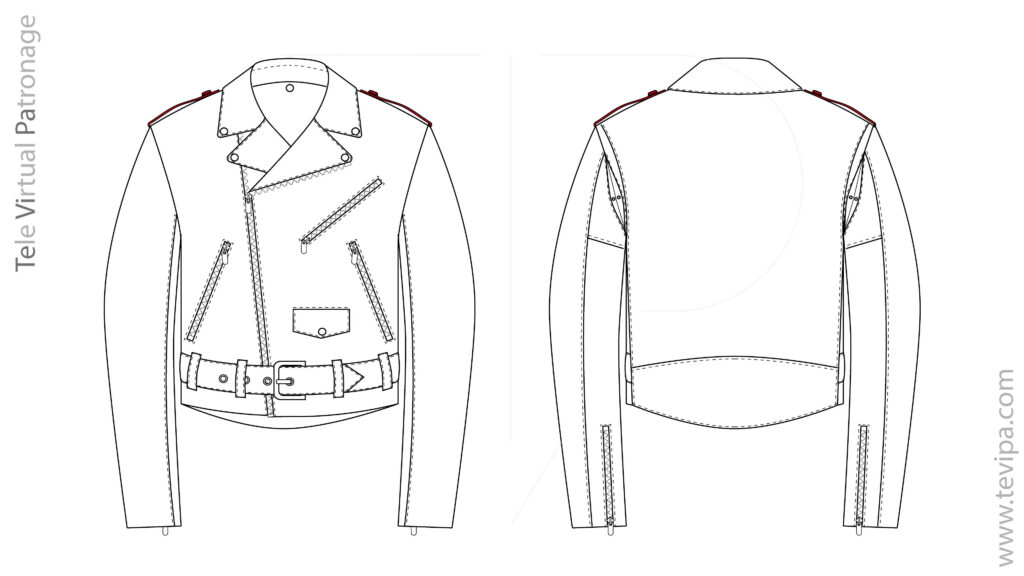
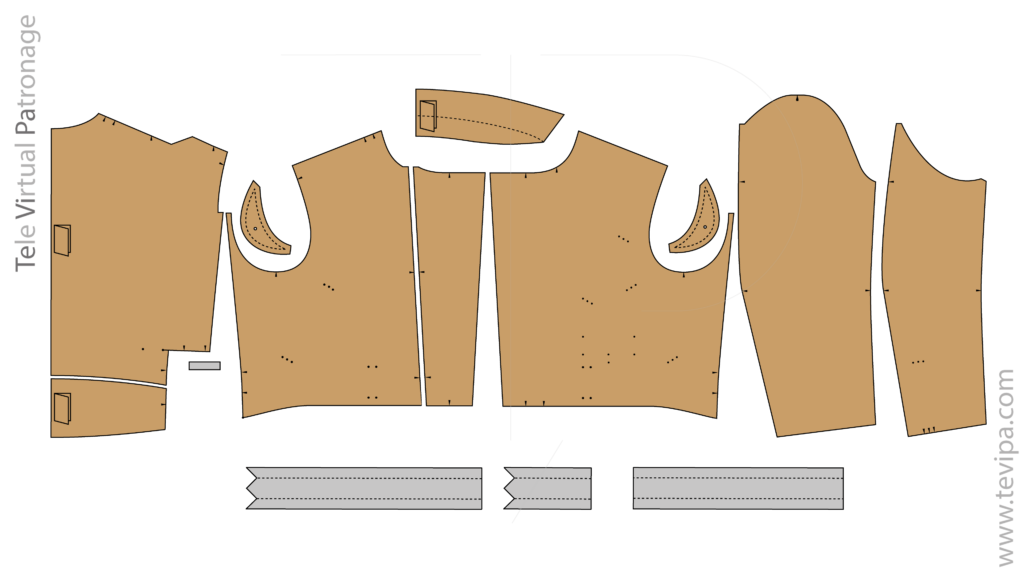
7 – External Structure of the Biker Jacket
With the epaulettes, we complete the external pieces of a biker-style jacket. We have progressively developed each of the aspects of this iconic jacket starting from our jacket block.
The main external pieces of a biker jacket are something similar to the following image.
A Final Note on Design Ethics
In this blog, we teach how to analyse, deconstruct, and understand the structure of a master garment so that you can apply that knowledge to your own pattern blocks.
But one thing is learning, and quite another is reproducing without judgement.
Reproducing a garment without judgement is an empty practice and shows little respect for design.
If what you are looking for is a Perfecto, the honest approach is to go to the original.
The original remains the reference, and respect for historical design forms part of our culture as pattern makers.
If you are looking for the true “armour” of New York, here is the official address:
Schott NYC – 618 Classic Perfecto
We are here to learn from the best, not to reproduce them.
The biker jacket is not a design — it is a system of technical decisions.