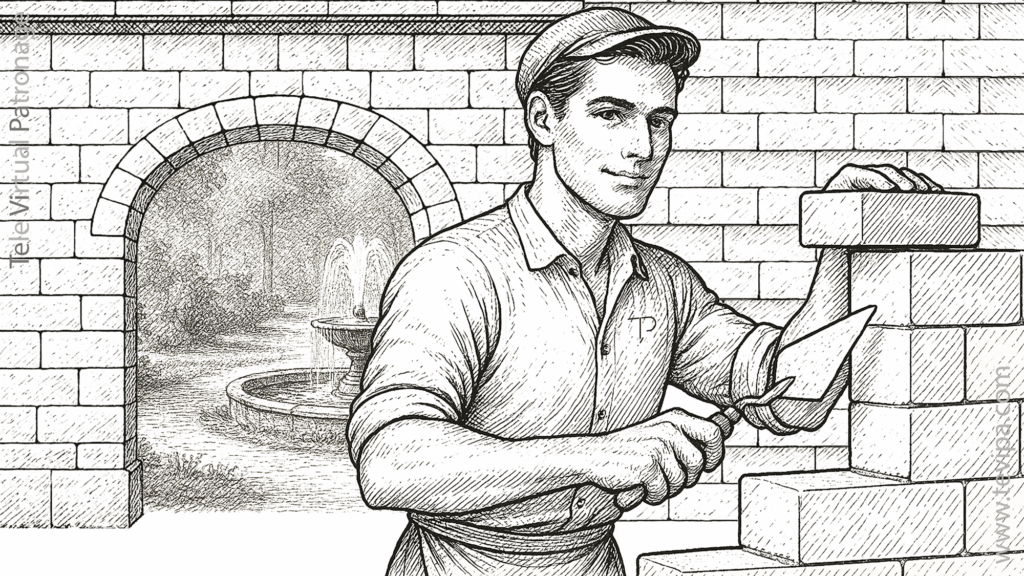
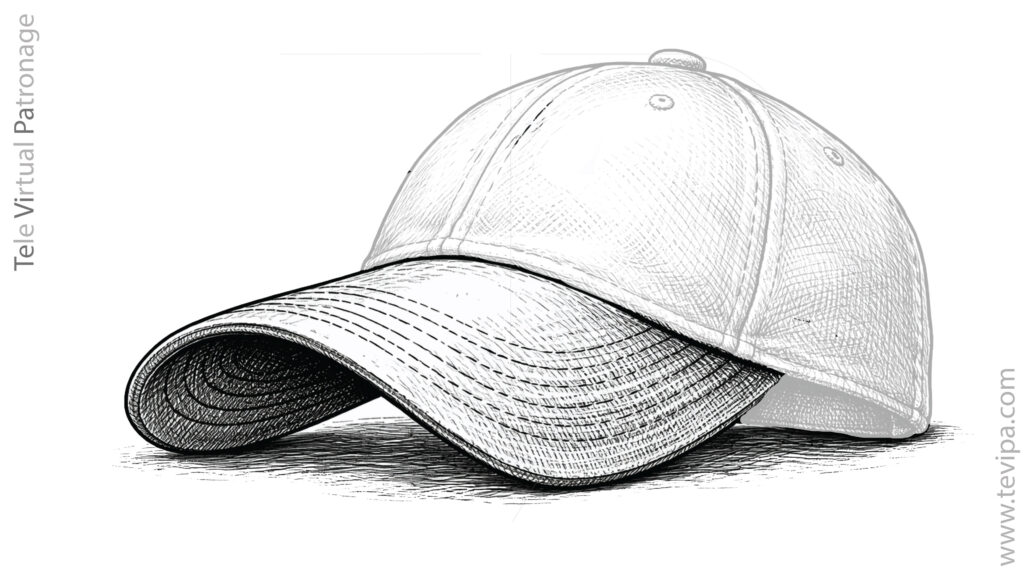
The Baseball Cap

Before continuing
All the calculations required to construct the cap have already been completed and organized in the technical table below.
You do not need to perform any mathematical operations if you prefer not to.
You can work directly with the values already calculated for each size.
This section explains the geometric foundation of the system, but the practical application is immediate thanks to the value table.
👉 Click here to go directly to the table.
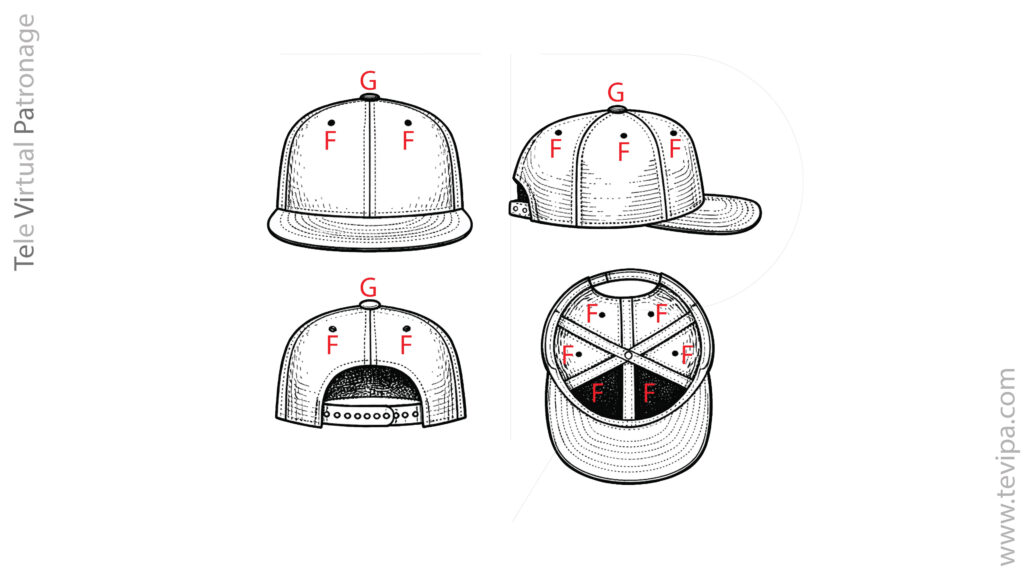
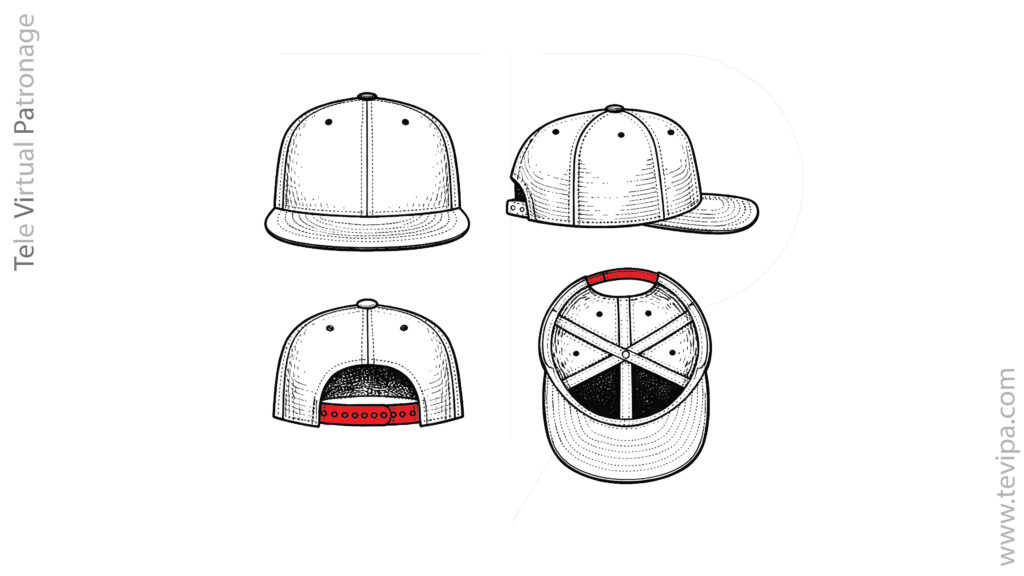
Nomenclature of the Baseball Cap
Below are the main parts of a baseball cap, incorporating commonly used synonyms in order to unify terminology and facilitate reader understanding.
a- Front panel (or front gore)
Piece or pieces forming the front part of the crown. In six-gore caps there are usually two; in five-gore caps, only one.
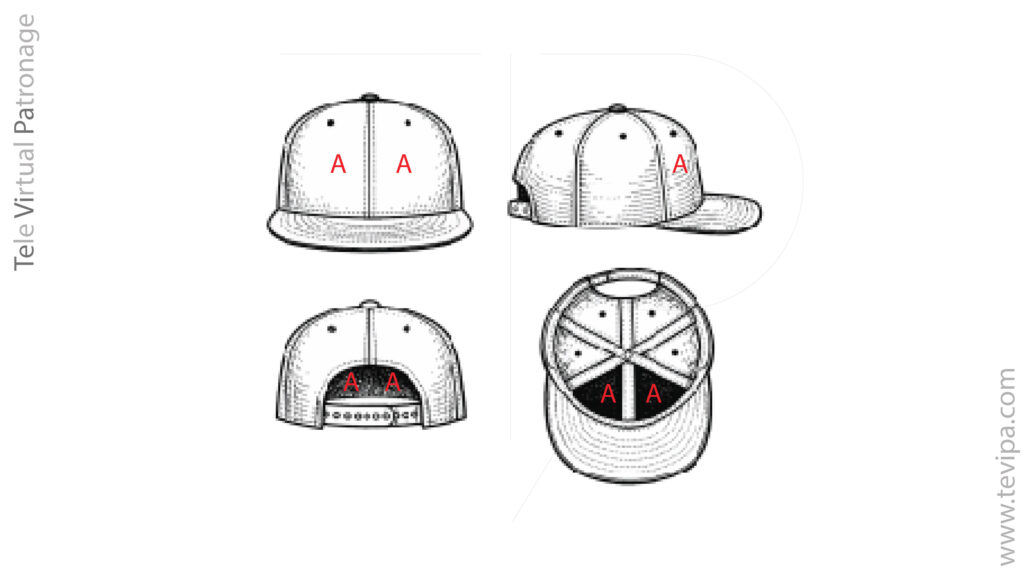
In some cases we find a dart between the two center-front panels, joining by pattern construction the lower part of the shared seam.

b- Panel lateral (o gajo lateral)
Pieza situada en los laterales de la copa, que enlaza los paneles frontales con los posteriores.
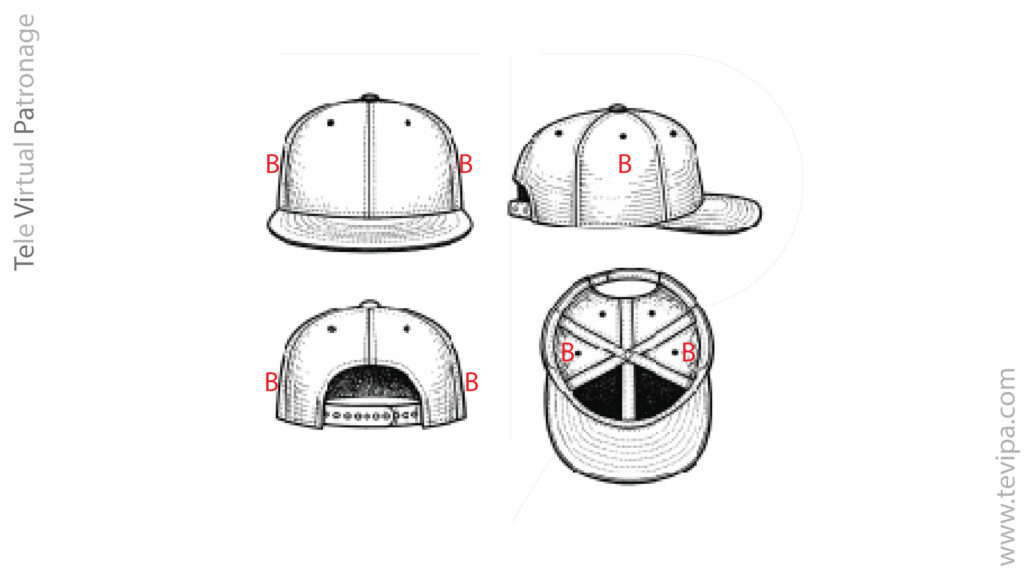
c- Side panel (or side gore)
Piece located on the sides of the crown, linking the front panels with the back panels.
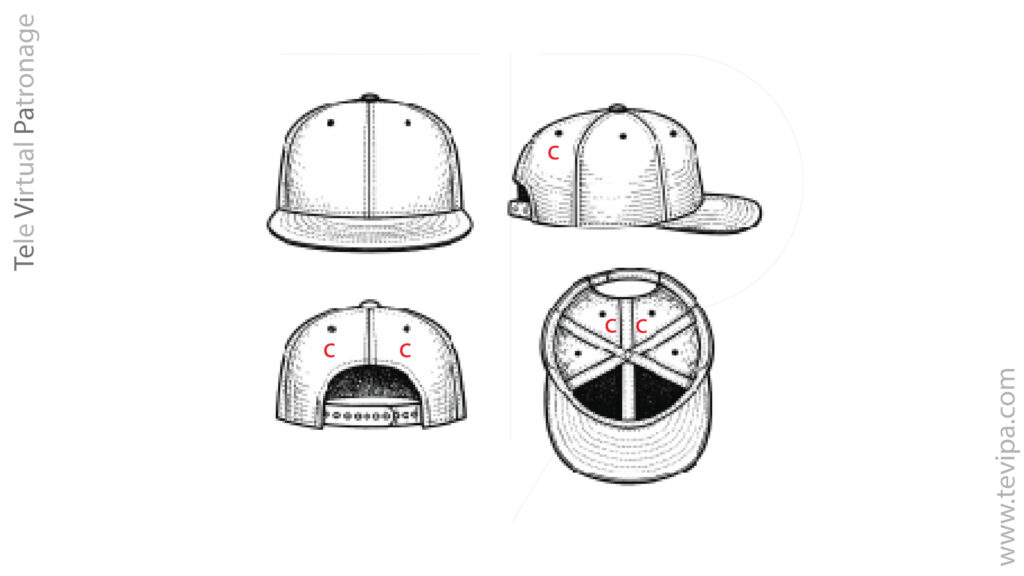
d- Crown (or cap body)
Assembly formed by all the panels or gores that cover the head.
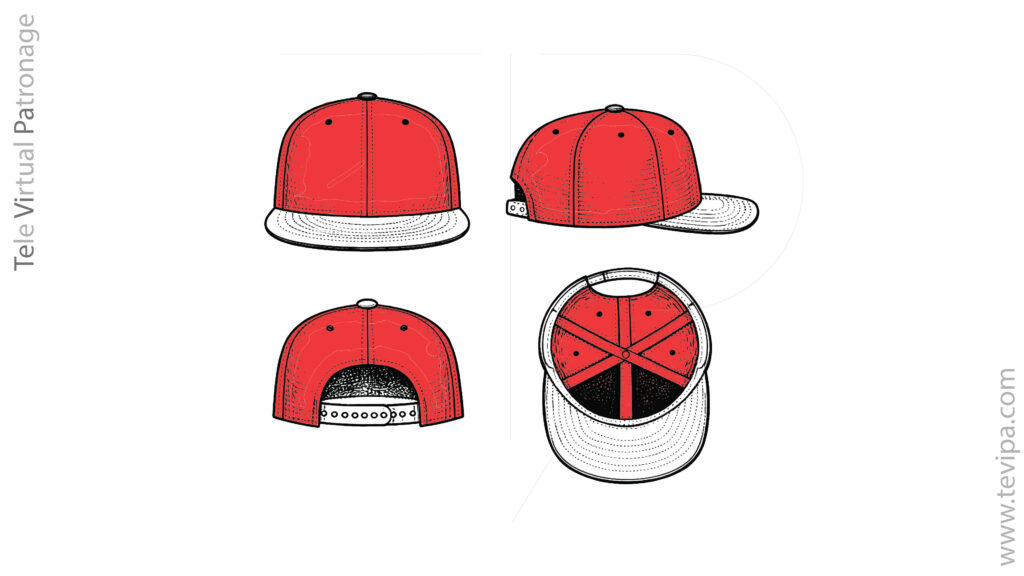
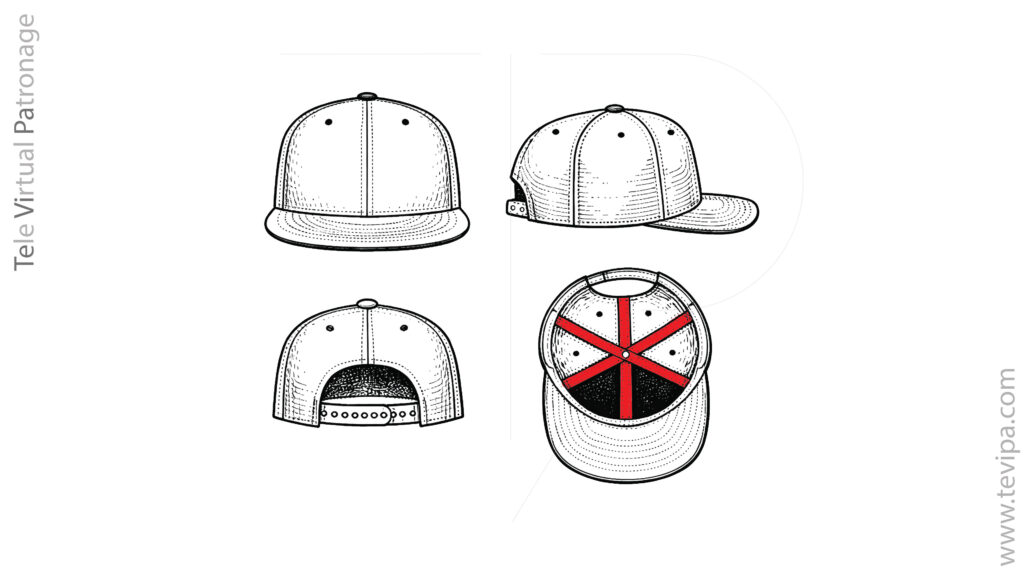
e- Crown seams
Seams that join the different panels and structure the crown.
f- Eyelets or ventilation eyelets
Small reinforced perforations, generally placed in each panel, intended for ventilation.
g- Top button
Piece located at the top of the crown covering the upper junction of the gores.
h- Upper brim
Rigid or semi-rigid upper piece located at the lower front part of the cap, intended to protect from the sun.
i- Lower brim
Inner surface of the brim, the part oriented toward the face. It may be lined, color-contrasted or reinforced depending on the model.
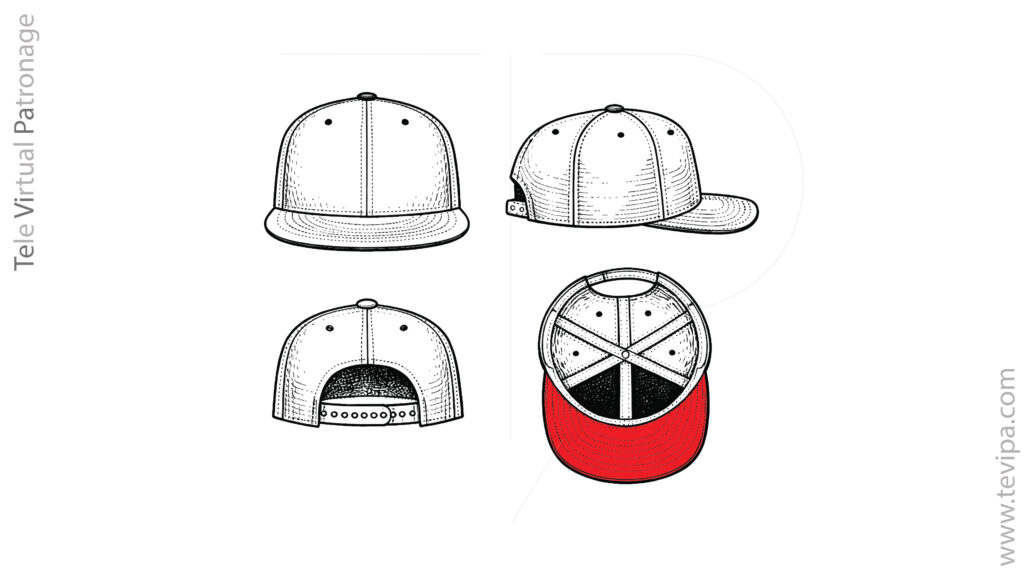
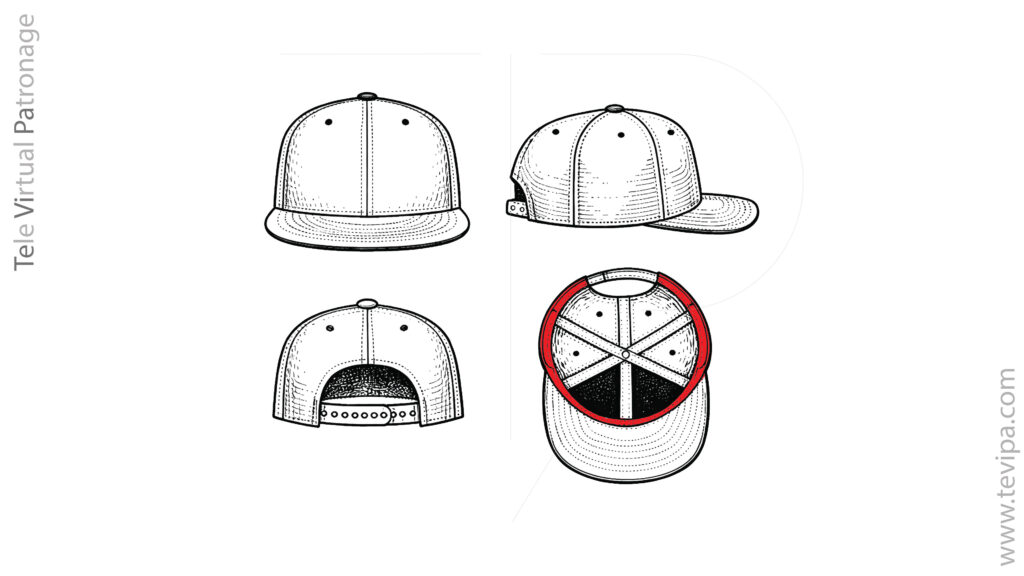
j- Inner band
Strip of fabric placed along the inner circumference of the cap, in contact with the head. Its function is to improve comfort, absorb sweat and stabilize the fit of the cap.
k- Seam tape
A tape applied over the interior seams of the gores. It serves to cover seam allowances, improve the interior finish and increase durability.
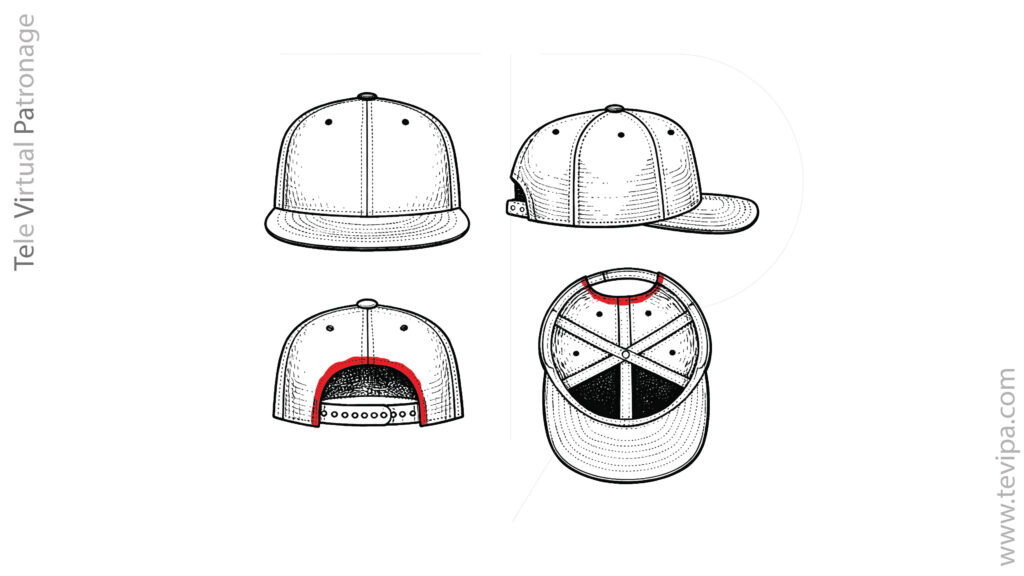
l- Back opening
Opening located at the rear of the cap that allows the passage of the adjustment system and facilitates adaptation to different sizes.
m- Adjuster
Adjustment element that passes through the back opening and allows regulation of the cap circumference. It may function through several systems.
We must distinguish the main fabric, the rigid interfacing and the lining:
- – The main fabric is the outer fabric of the cap
- – As rigid interfacing, Buckram is commonly used; this is a rigid or semi-rigid material placed between layers to give structure to the crown (especially at the front).
- – Interior lining that covers or accompanies this structure to improve finish and comfort.
How to take the full head circumference measurement
For the basic construction of the traditional system, the head circumference is sufficient.
However, for a more precise fit and a correct volumetric proportion of the crown, the cranial diameters may also be incorporated.
Head circumference
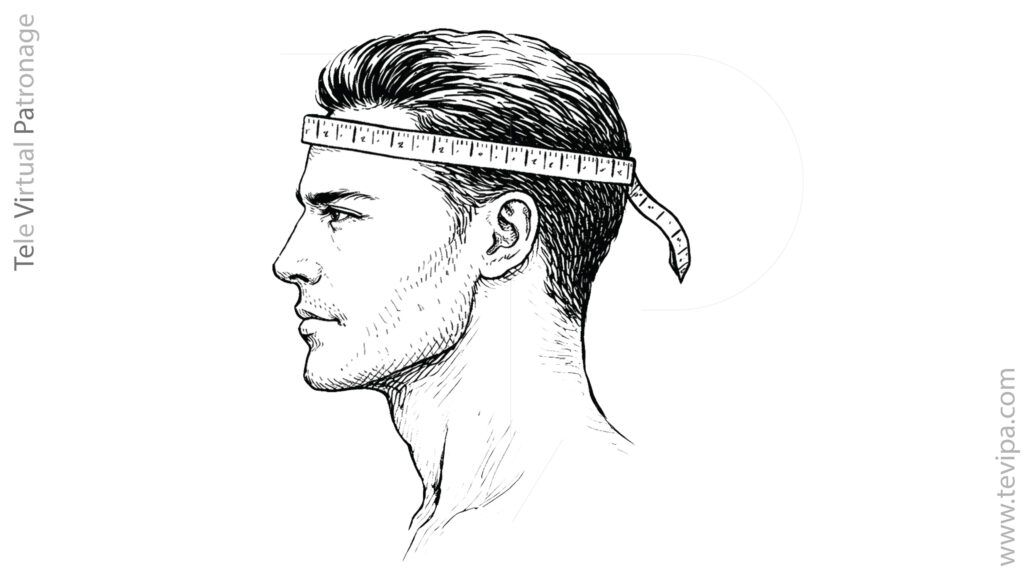
Use a flexible measuring tape, placing it around the head at forehead level (about 1–2 cm above the eyebrows and ears) and across the widest part of the back of the head. The tape should be snug, but not tight.
Cranial Diameters
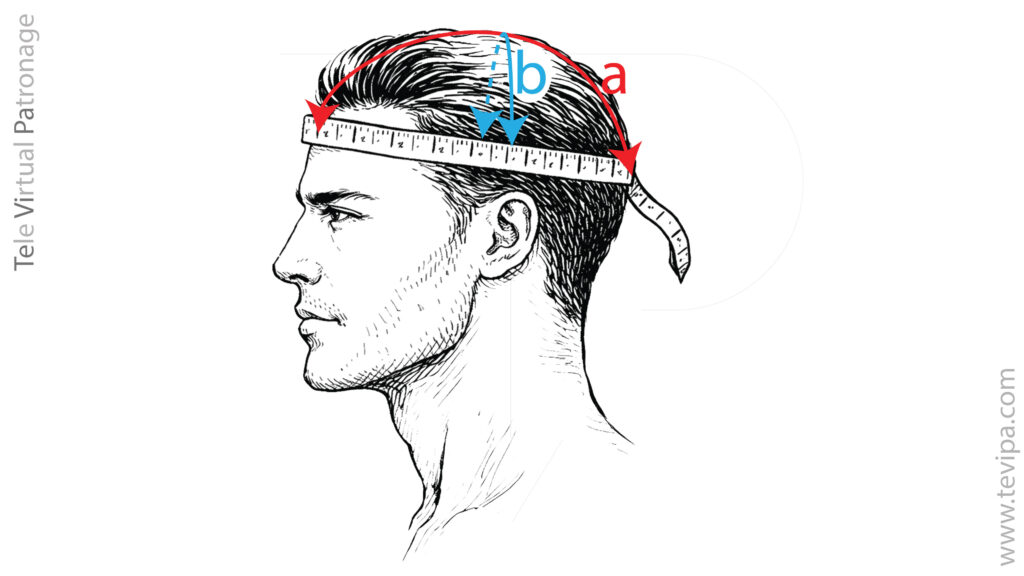
Take two diameters:
• Anteroposterior diameter (a)
Measure the distance between the midpoint of the forehead (the slightly prominent frontal area) and the most projecting point of the occipital bone, following an imaginary straight line that runs through the head from front to back.
• Bilateral diameter (b)
Measure the distance between the two widest lateral points of the skull (right and left parietal regions).
To ensure accuracy, place an elastic band along the cap’s support line.
Take all measurements exactly at the level corresponding to that line.
These two measurements do not replace the head circumference; they complement it when you seek a more refined volumetric fit. If you prefer not to measure the cranial diameters individually, use the reference values included in the technical table at the end of this document.
These values come from anthropometric averages and allow correct construction in most cases. However, direct measurement always provides a more precise volumetric fit, especially for structured sizes or heads with particular proportions.
Baseball cap sizes
The size of a baseball cap corresponds directly to the full head circumference, expressed in centimeters.
The size range extends from 34.5 cm to 61 cm.
| Age / Group | C (cm) |
| Newborn (0 m) | 34.5 |
| 3 months | 40.5 |
| 6 months | 43.3 |
| 12 months (1 yr) | 46.1 |
| 2 years | 48.3 |
| 4 years | 50.2 |
| 6–7 years | 52 |
| 10 years | 53.5 |
| 13–14 years | 55 |
| Adult S/M | 57 |
| Adult L | 59 |
| Adult XL | 61 |
Crown Pieces
Crown heights
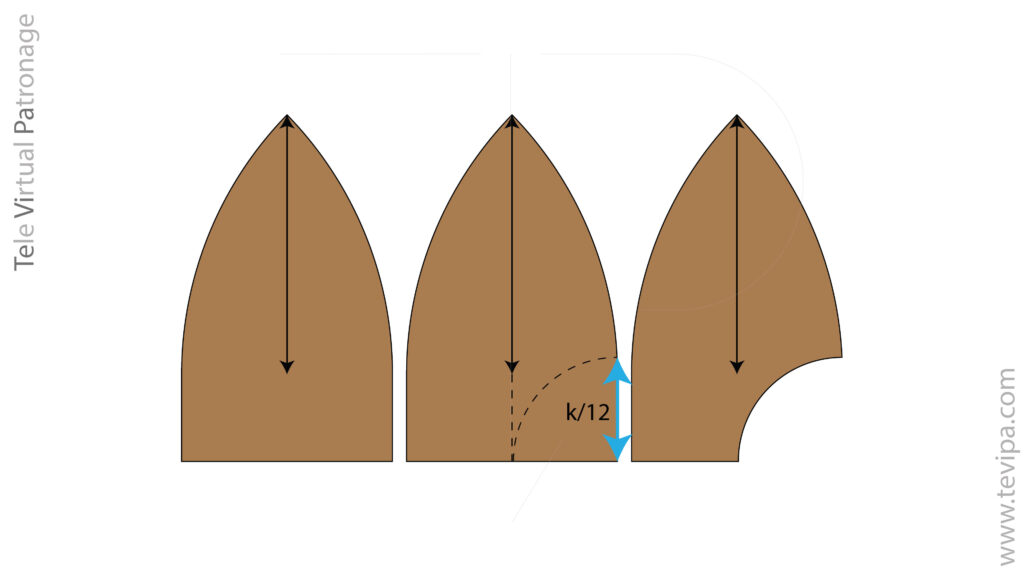
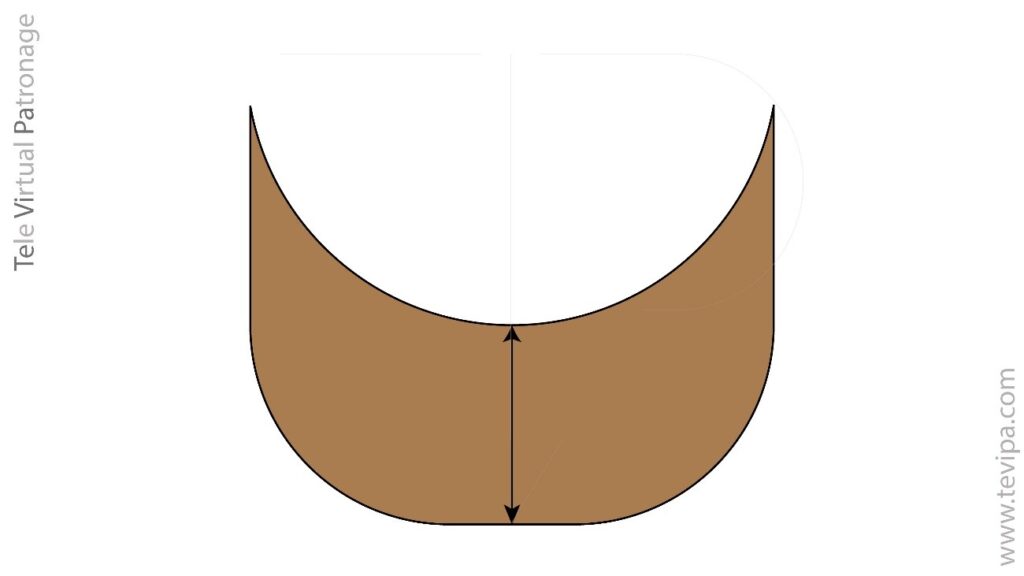
The crown height is the vertical measurement between the top point of the cap (the apex of the panels) and the inner support plane that rests on the head.
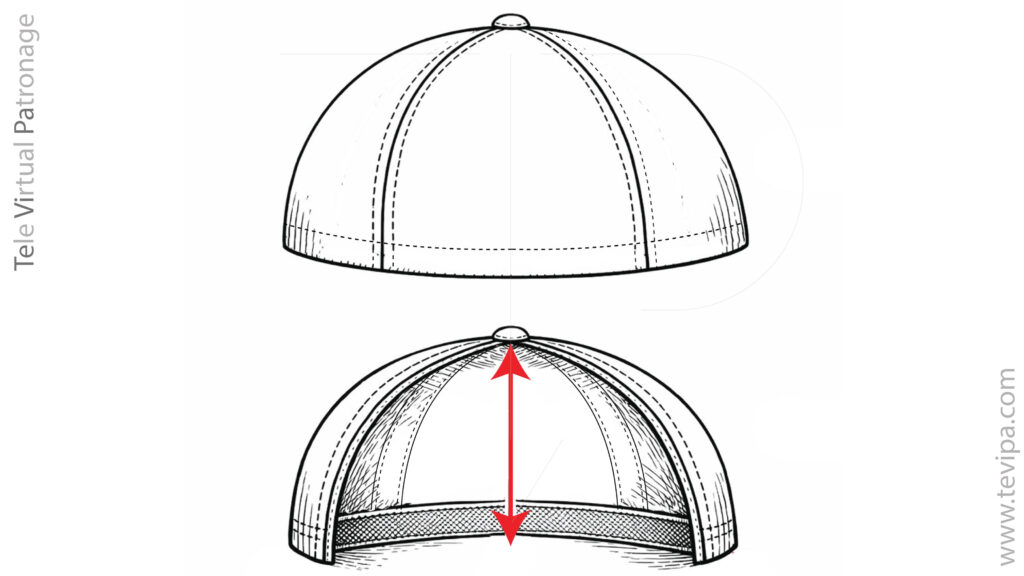
In the traditional system, you determine this height as a percentage of the head circumference. However, this method assumes that all heads with the same circumference share similar volumetric proportions, which is not always true, especially in structured sizes.
To achieve a more stable shape and avoid ogive deformation or excessively low crowns, you can relate the height of the curved portion of the crown to the equivalent cranial diameter.
Define the equivalent diameter as:
where L represents the anteroposterior diameter and W the bilateral diameter.
Establish the dome height as a constant proportion of this diameter:
The coefficient 0.70 provides a balanced dome, close to the equivalent spherical geometry of the skull, and prevents both the “flat crown” effect and the ogival tendency in structured models.
Do not obtain the variation between low, medium, or high models by modifying this proportion; instead, adjust the lower structural segment of the panel.
In this way, express the total crown height as:
where H_base represents the height added in the lower section of the panel.
This approach allows you to maintain a harmonious and stable dome across all sizes, varying only the visual proportion of the whole without altering the upper geometry.
The total crown height determines the visual character of the cap.
You can construct the same size with a lower, intermediate, or higher placement by modifying the vertical proportion of the whole without changing the support circumference.
This variation lets you adapt the model to different styles, from discreet configurations close to the skull to more structured versions with greater presence.
In the system described, do not achieve this difference by modifying the curvature of the dome; instead, adjust the height of the lower structural segment of the panel: low base (a), medium base (b), and high base (c).
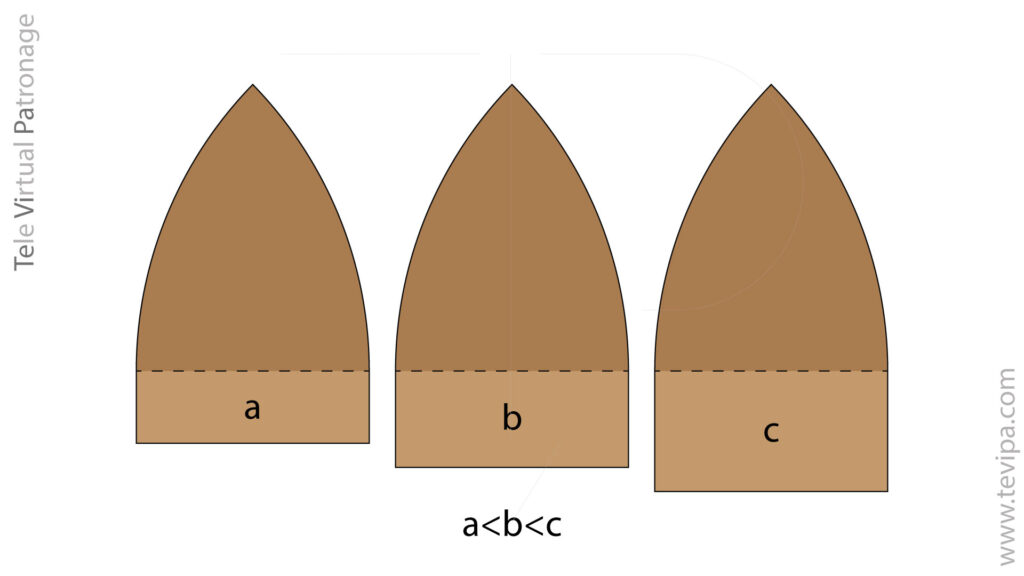
Design the height of the panel base, in general terms, as b, regardless of whether it corresponds to a low, medium, or high configuration.
| Size | Circumference (cm) | Low Base (cm) | Medium Base (cm) | High Base (cm) |
| Newborn (0 m) | 34.5 | 1.5 | 2 | 2.5 |
| 3 months | 40.5 | 1.5 | 2 | 2.5 |
| 6 months | 43.3 | 1.5 | 2 | 2.5 |
| 12 months (1 yr) | 46.1 | 1.5 | 2 | 2.5 |
| 2 years | 48.3 | 1.5 | 2 | 2.5 |
| 4 years | 50.2 | 1.5 | 2 | 2.5 |
| 6–7 years | 52 | 1.5 | 2 | 2.5 |
| 10 years | 53.5 | 1.5 | 2 | 2.5 |
| 13–14 years | 55 | 1.5 | 2 | 2.5 |
| Adult S/M | 57 | 3 | 4 | 5 |
| Adult L | 59 | 3 | 4 | 5 |
| Adult XL | 61 | 3 | 4 | 5 |
Number of gores of a baseball cap
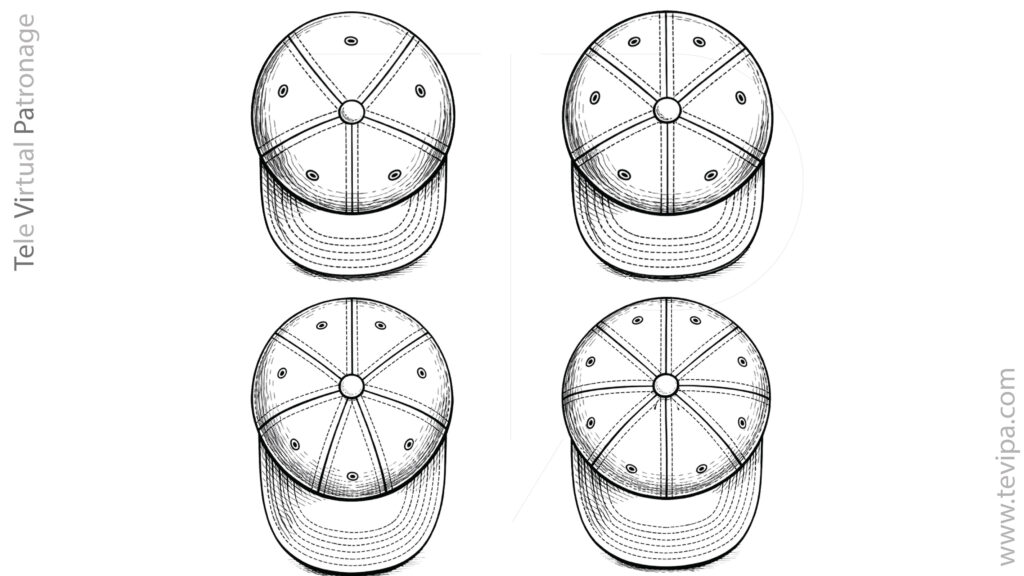
A baseball cap may be constructed with 5, 6, 7 or 8 gores.
The number of gores or panels does not change the circumference or the dome height; it only changes how the cap surface gets subdivided.
The most common configuration is the 6-gore model, which constitutes the classic and most widespread version.
Caps with 7 or 8 gores are closer to the field of hat-making, as they allow a finer subdivision of the crown surface and a distinct formal character.
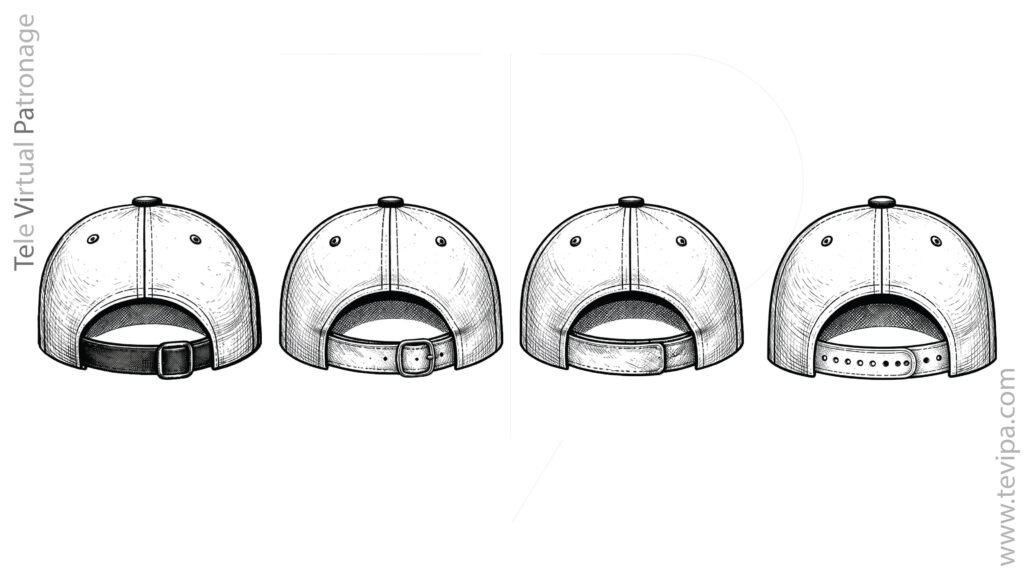
5- and 6-gore caps may incorporate a rear adjuster for size regulation. In this case, the two rear pieces are presented open, excavating a section of the back edge of the crown to accommodate the adjustment system.
The use of an adjuster is especially frequent in 5-gore caps. The adjuster may function through different systems, the most common being: strap, buckle or metal adjuster, Velcro or snapback.
Geometric construction of a cap gore
Definition of the system
- Start from a closed cap defined by:
- a head circumference k,
- a crown height c,
- a base height b,
- and a number of panels n, chosen freely for constructional or aesthetic reasons.
Obtain the total panel height as the sum of the dome and the base:
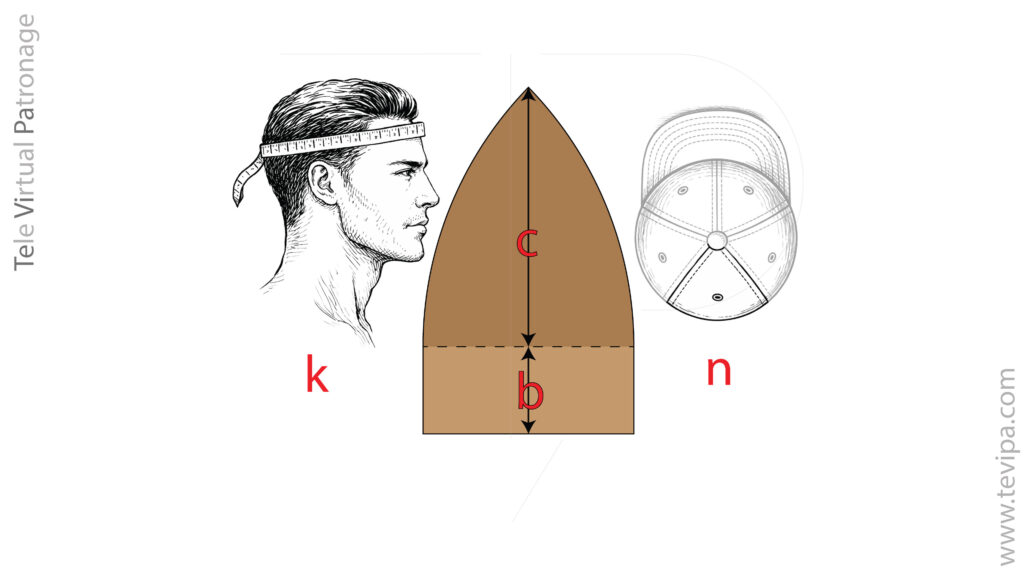
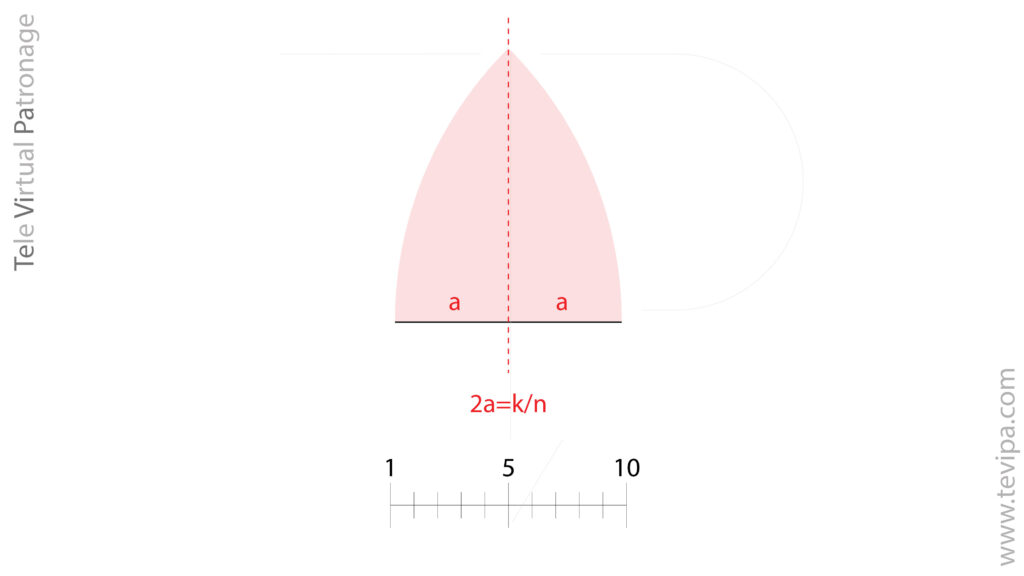
Base of the gore
The base of each gore is obtained by dividing the total circumference by the number of gores:
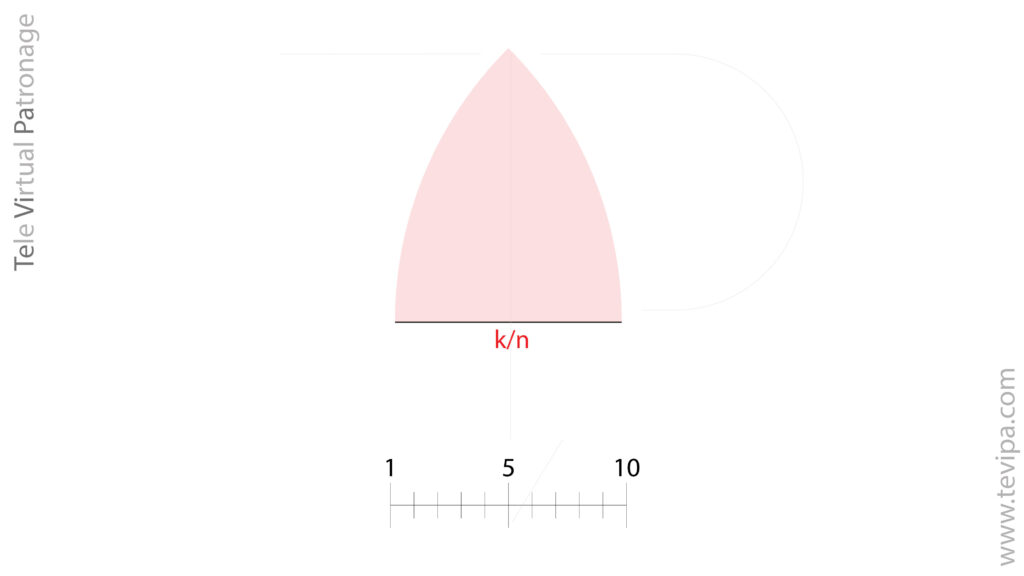
This base represents the flat development of the equatorial arc corresponding to each panel. This value does not depend on the dome height (c) or the base height (b), since it depends only on the head circumference and the number of panels.
This base represents the flat development of the equatorial arc corresponding to each panel.
Axis of the gore
A horizontal segment is drawn with the length of the gore base.
At the midpoint of this segment, a perpendicular is raised, constituting the axis of symmetry of the gore.
Crown height
Mark the crown height (c) on this axis, measuring it perpendicularly from the base
The upper end of this perpendicular defines the apex of the panel, which corresponds to the crown point of the head.
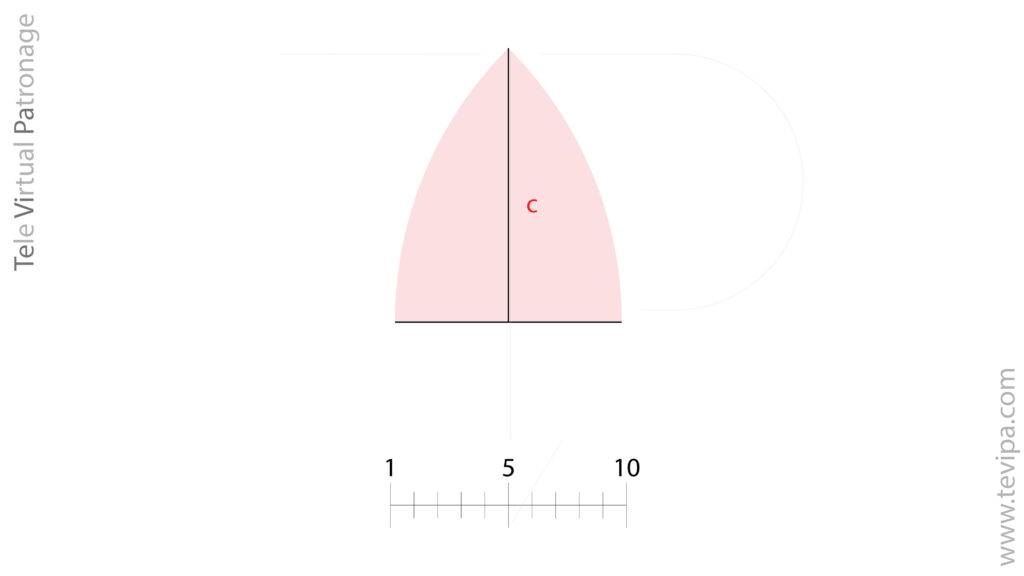
Construction of the lateral arc
The apex is joined to one end of the base with a straight segment.
At the midpoint of this segment, a perpendicular is drawn to it.
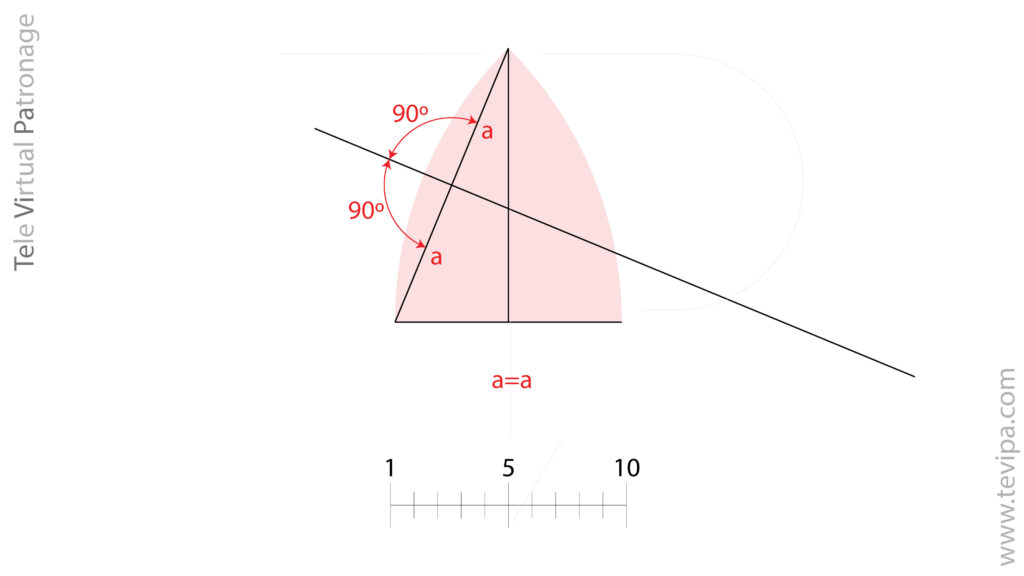
Determination of the center of the arc
The base line of the gore is extended.
The point where the perpendicular drawn in the previous step intersects this extension defines the geometric center of the lateral arc of the gore.
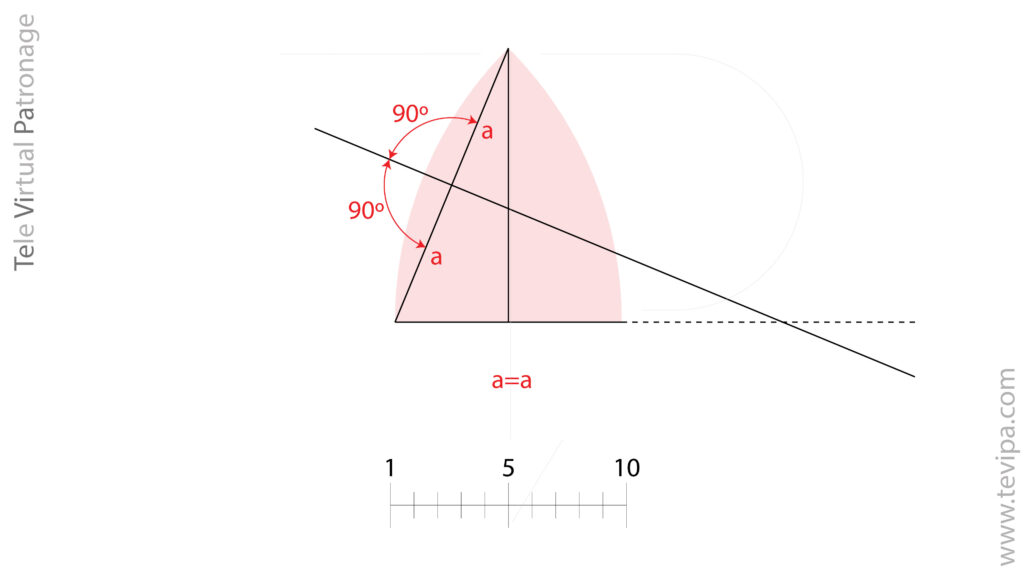
Drawing the gore
With this center, the arc joining the base end with the apex is drawn.
The same procedure is repeated symmetrically on the opposite side of the central axis.
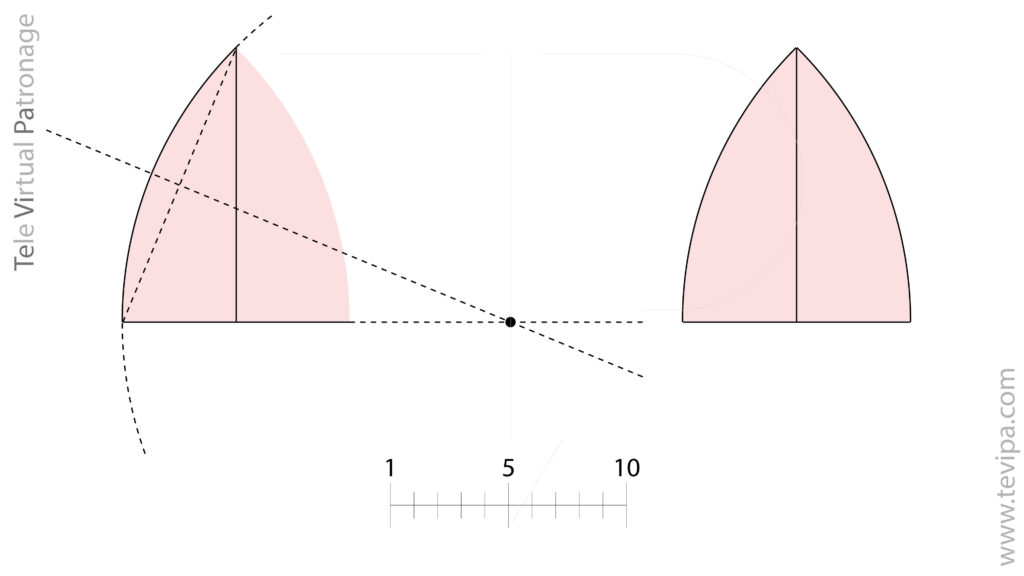
Result
- The resulting outline defines the panel cap:
- • symmetrical,
- • geometrically consistent,
- • with constant curvature,
- • and compatible with the correct closure of the crown when you assemble all panels.
This drafting corresponds to the upper curved section (the crown dome). You then add the lower structural segment, which we call the base (b), to complete the total height of the panel.
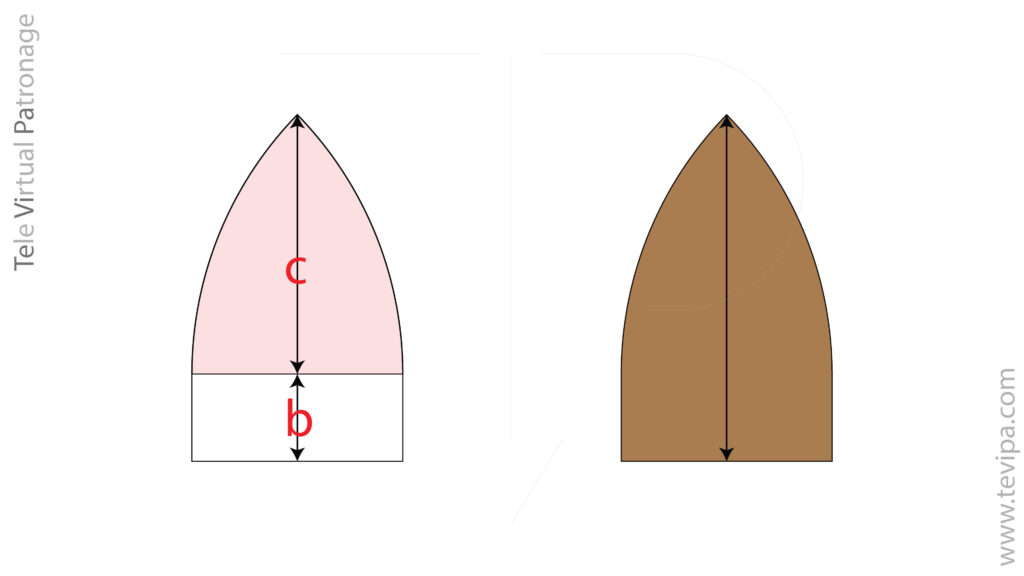
Complete Panel
Once you construct the panel dome, add the lower structural segment corresponding to the base (b).
From the original base line, draw two perpendicular segments downward, each with a length equal to the value of b defined in the section “Crown Heights.”
Join the lower ends of these segments with a straight line parallel to the original base line. This produces the complete panel, whose total height equals:
System Scalability
By maintaining this method:
• control the size exclusively through the head circumference (k)
• determine the dome geometry through the relation c = 0.70 · d_eq
• adjust the total panel height through the base (b)
• and vary the number of panels (n) without altering either the size or the vertical proportion of the model.
This decoupling of variables allows you to apply the system to any size, from newborn to adult, without altering the proportion or the stability of the cap.
The brim
Brim Definition
The brim is the front element of the baseball cap, generally rigid or semi-rigid, whose main function is to protect the eyes from the sun. However, its importance is not purely functional: it is the element that projects the cap forward visually and largely defines its aesthetic character.
From a construction standpoint, draft the brim flat and then shape it into curvature. Do not design it arbitrarily; relate it directly to the head circumference (k) on which you build the crown.
In our system, develop the brim through a proportional and scalable method. This approach allows you to generate any size — from baby to adult — while maintaining the geometric coherence of the whole.
The brim depends on three main parameters:
- Width, determined by the opening angle.
- Length, which defines the frontal projection.
- Rounding, which softens the tips and the transition between the sides and the front section.
These three parameters allow you to control both the proportion and the visual behavior of the piece precisely, avoiding deformation or improvised solutions. In the following sections, we will develop each of them independently.
Brim Width
The brim width determines how much the front section “embraces” the head. This parameter defines its lateral opening and therefore its visual presence within the overall cap.
Unlike the length — which projects the piece forward — the width controls its extension along the front perimeter of the skull. A wider brim creates a more enveloping and sporty image; a narrower one produces a lighter and more restrained effect.
From a geometric standpoint, define the width through a central angle drawn on the head circumference (k). This angle determines the base arc on which you construct the piece and, consequently, its lateral opening.
The larger the angle, the greater the frontal arc the brim occupies along the head perimeter and the more enveloping its appearance becomes. The smaller the angle, the more restrained and lighter the lateral projection will appear.
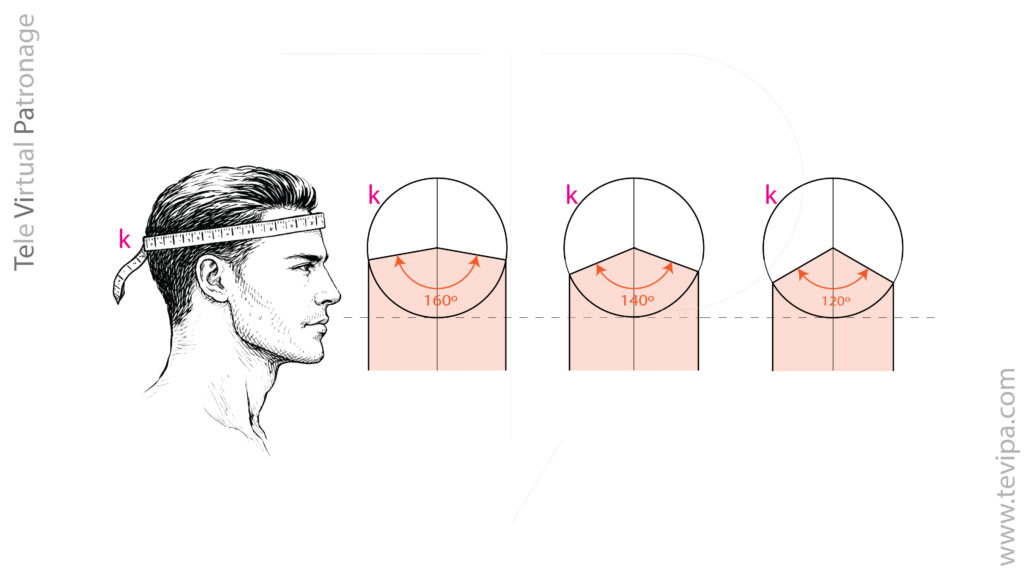
In our system, define three proportional variants:
- 120° → narrow brim
- 140° → medium brim
- 160° → wide brim
These three options allow you to modulate the character of the cap without altering its geometric coherence, since you always calculate the angle in direct relation to the head circumference. If you represent the head circumference as a circle, simply mark the three proposed angles on it to visualize immediately the corresponding width of each variant.
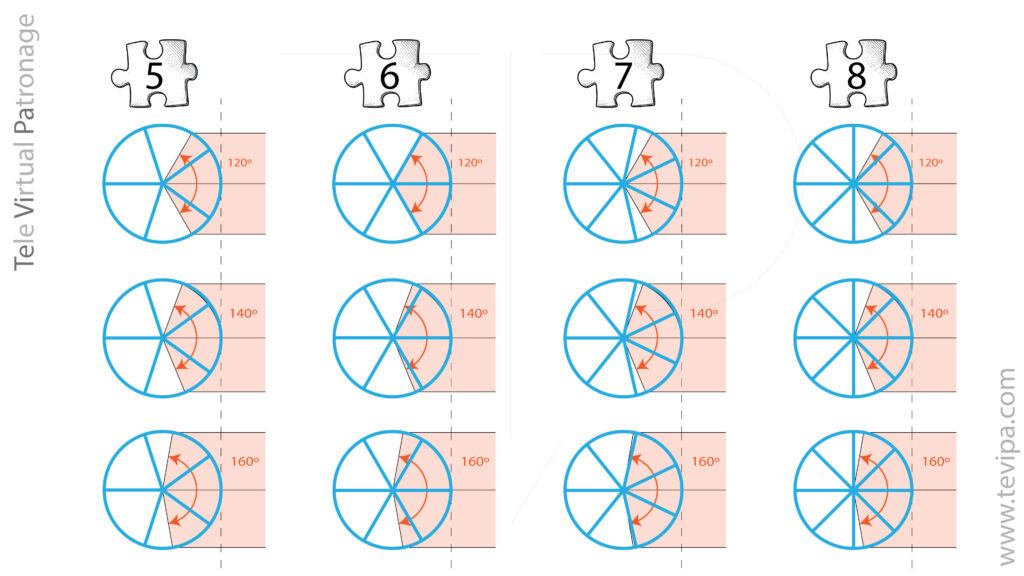
In standard constructions — whether with five, six, seven, or eight panels — these angles relate differently to the seams. However, the brim width does not depend on the number of panels; it depends solely on the arc defined on the head circumference.
In the next section, we define the second fundamental parameter: the brim length.
Brim Length
The brim length determines its frontal projection, that is, the distance the piece extends forward from the head circumference.
While you define the width through an angle along the perimeter, construct the length in direct relation to the radius (r) of the base circle.
Recall that you obtain this radius from the head circumference (k) through the relation:
In this way, each size automatically generates its corresponding radius, ensuring the proportional coherence of the system.
Instead of expressing the length as a fixed measurement in centimeters, define it as a fraction of the radius. Establish three variants:
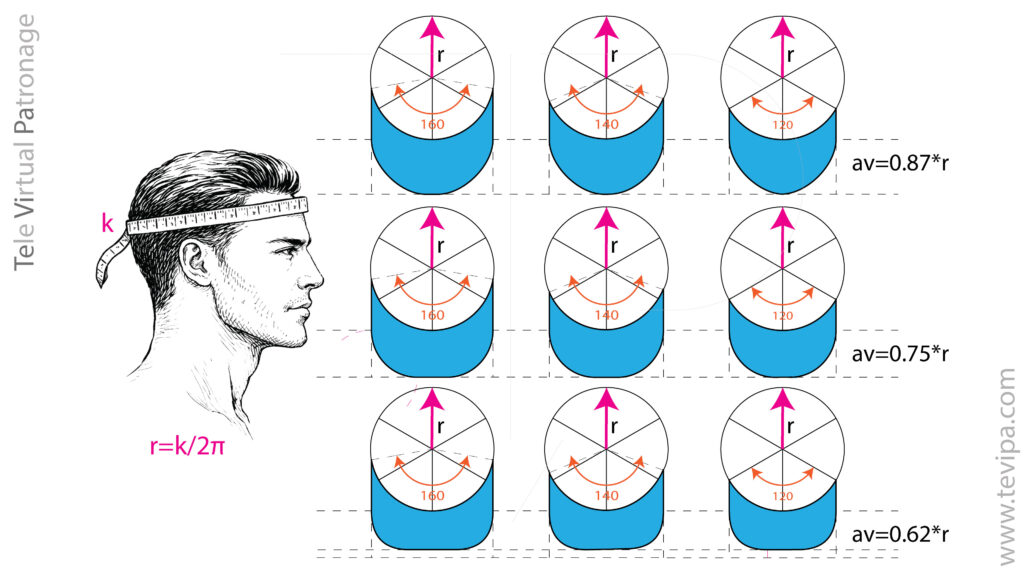
- 0,87 r → long brim
- 0,75 r → medium brim
- 0,62 r → short brim
These proportions allow you to modulate the frontal presence of the cap without breaking its geometric balance. Since the length depends on the radius, it scales automatically with any head circumference.
The numerical difference between these three options may seem small, but it produces clearly perceptible visual variations in the final result. Increasing the fraction of the radius enhances projection and gives the piece greater presence; reducing it creates a more restrained and lighter brim.
Measure the length along the central front axis, from the base arc defined by the angle to the front edge of the brim. In the next section, we address the third fundamental parameter: brim rounding, which regulates the transition between the front and the sides.
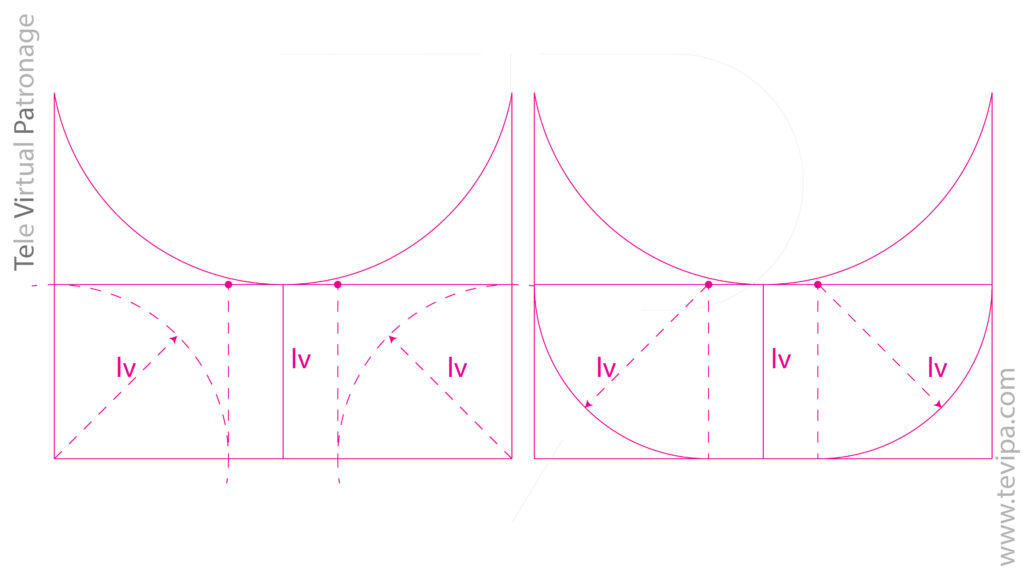
Brim Rounding
Rounding regulates the transition between the front and the sides of the brim. It does not modify either the angle or the length, but it determines how smoothly they meet.
In the previous illustrations, the brims already appear rounded. This allows you to observe how the form evolves when you construct the rounding in coherence with the frontal projection.
In our system, do not draw the rounding arbitrarily. Obtain it by using the brim projection itself as an auxiliary radius.
In other words, use the length defined as a fraction of r (0.62 r, 0.75 r, or 0.87 r) as the radius of the circle that generates the transition arc at the tips.
Thus:
- A short brim produces a more restrained rounding.
- A medium brim creates a balanced transition.
- A long brim offers a broader and more enveloping curve.
The result is a fully proportional system in which the rounding scales automatically together with the length and maintains coherence at any size.
This procedure prevents breaks, forced tangencies, or rigid terminations, ensuring geometric continuity along the perimeter of the piece.
Rear Adjustment of the Cap
In adjustable caps, the rear opening allows you to adapt the circumference without altering the frontal geometry. Its construction must maintain proportional coherence both with the head circumference and with the panel structure. In our system, define the opening through two simple and constant rules
.
Rear Opening Height
Calculate the height as:
where k represents the head circumference.
This proportion maintains stable visual balance at any size and reproduces correctly the height we established for the base six-panel cap.
Example for size 59:
That is, approximately 5 cm.
The height depends exclusively on the circumference and not on the number of panels.
Rear Opening Width
Determine the width according to the base of the rear panel.
Rule:
Each side of the opening occupies half of one panel base
Therefore:
Total opening width = one complete panel base
This guarantees:
- Perfect symmetry.
- The opening never extends beyond the center of the adjacent side panels.
- Structural coherence regardless of the number of panels.
Examples for size 59:
- In a 6-panel cap (base ≈ 9 cm) → opening ≈ 9 cm
- In an 8-panel cap (base ≈ 6.5 cm) → opening ≈ 6,5 cm
The more panels the cap has, the more contained the opening becomes, while maintaining the overall visual balance.
Brim Drafting
Before starting, note that you can find all the values required for this drafting (circumference, theoretical radius, angle β, lengths, and proportions) in the table in the following section.
In this section, we focus exclusively on the geometric procedure.
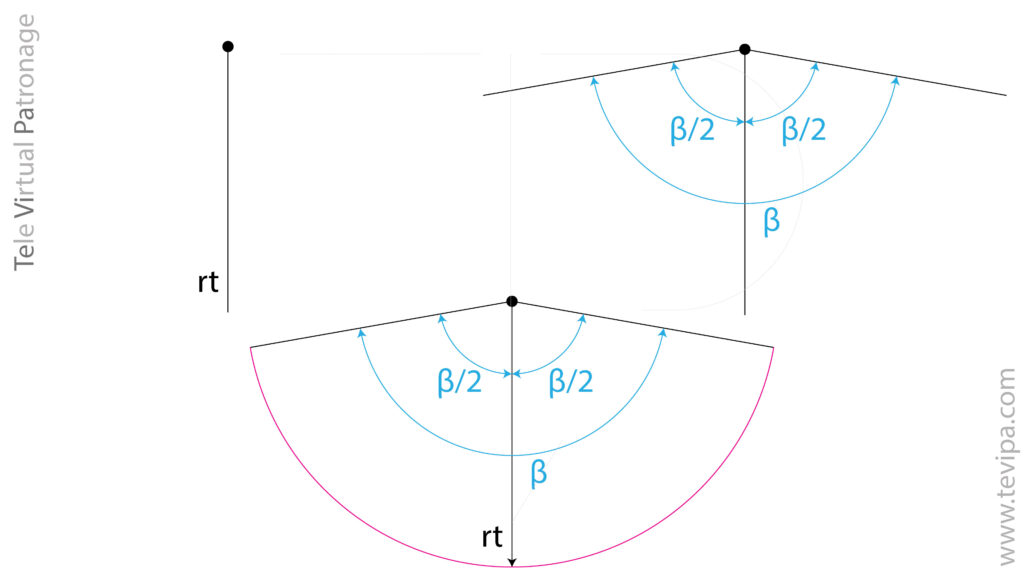
Start from a point that will act as the construction center.
From this point, draw vertically the theoretical head radius (rt), which forms the axis of symmetry of the system.
At the upper end of this axis, construct the total brim angle (β), dividing it into two equal parts:
- β/2 to one side
- β/2 to the other side
These two directions define the frontal opening of the brim.
Next, from the same upper point, draw an arc connecting the three resulting lines (the vertical axis and the two lateral directions).
This arc — shown in magenta in the illustration — corresponds to the junction line between the brim and the crown of the cap.
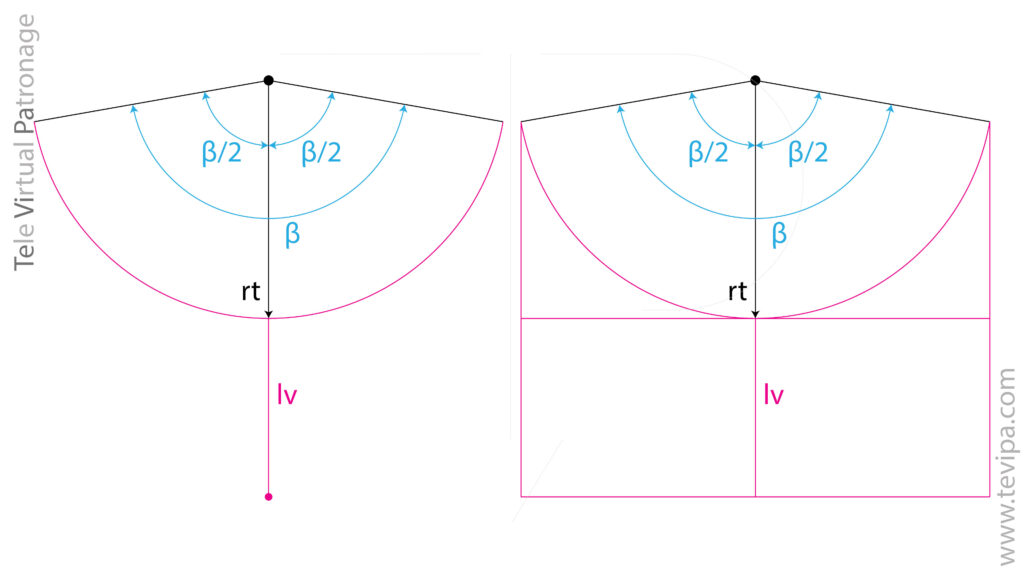
From the previous construction, extend the vertical axis corresponding to the theoretical radius (rt) by adding the brim length value (lv).
In other words, extend the vertical line until you complete the total depth of the brim.
At the point where rt ends and lv begins, draw a line perpendicular to the vertical axis.
From the lower end of the brim length, draw a line parallel to the previous one.
Finally, draw two lines parallel to the theoretical radius axis (rt) passing through the start and end points of the arc that connects to the crown. These operations define the “structural rectangle” within which the brim will be developed.
From the two lower corners of the structural rectangle, measure inward toward the center the brim length (lv).
Through the points obtained, draw perpendicular lines upward from the lower line until they intersect the upper parallel line.
The resulting intersection points form the centers of the rounding arcs of the brim. Use the brim length (lv) as the radius of these arcs.
Delete the auxiliary construction lines and keep only the final brim outline.
The resulting axis of symmetry — corresponding to the extension of the theoretical radius (rt) plus the brim length (lv) — constitutes the straight grain of the piece.
Cap Value Table
The following values allow you to construct any cap size while maintaining proportional coherence between crown, brim, and rear opening.
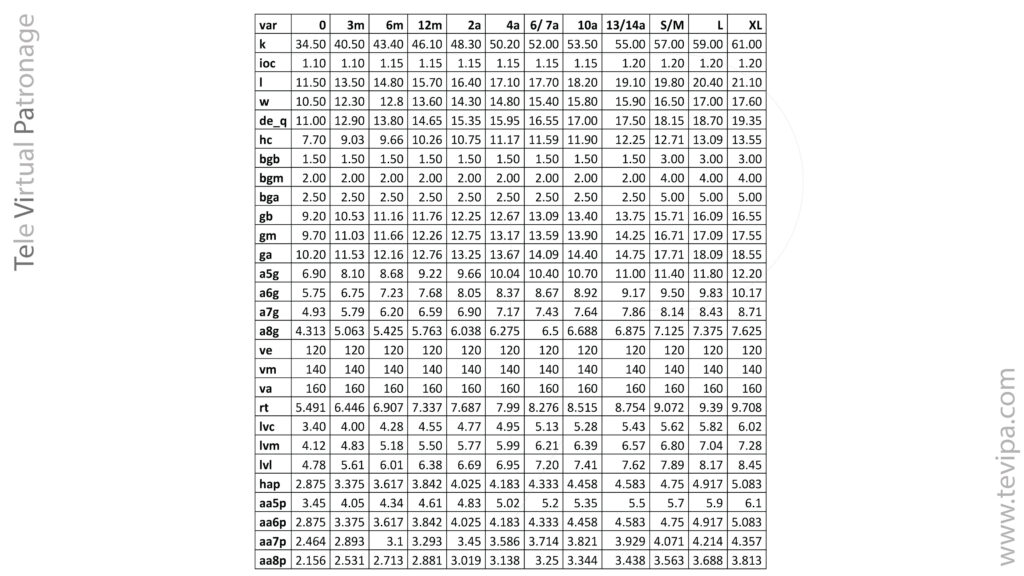
Horizontal variables:
0 = newborn; (3, 6, 12) m = months; (2, 4, 6/7, 10, 13/14) a = years
Vertical variables:
| k | Head circumference |
| ioc | Cranial ovality index |
| l | Anteroposterior cranial diameter |
| w | Bilateral cranial diameter |
| de_q | Equivalent diameter |
| hc | Dome height |
| bgb | Low panel base |
| bgm | Medium panel base |
| bga | High panel base |
| gb | Low panel total height |
| gm | Medium panel total height |
| ga | High panel total height |
| a5g | Base width 5 panels |
| a6g | Base width 6 panels |
| a7g | Base width 7 panels |
| a8g | Base width 8 panels |
| ve | Narrow brim angle |
| vm | Medium brim angle |
| va | Wide brim angle |
| rt | Theoretical radius |
| lvc | Short brim length (0.62 * rt) |
| lvm | Medium brim length (0.75 * rt) |
| lvl | Long brim length (0.87 * rt) |
| hap | Rear opening height |
| aa5p | Rear opening width 5 panels |
| aa6p | Rear opening width 6 panels |
| aa7p | Rear opening width 7 panels |
| aa8p | Rear opening width 8 panels |
Cap components

The panel pieces will be cut from the main fabric (brown), from the interfacing (orange), and, optionally, from the lining (grey).
The visors are cut from the main fabric, although in some cases they may be made from contrasting or printed fabrics.
The inner band may be made from the same main fabric or from a pre-made band.
Structurally, in the classic baseball cap, the inner band measures 3 cm.
Although this measurement is the standard, slight variations may be introduced depending on age:
• Adults → 3 cm
• Youth → 3 cm
• Child → may be reduced to 2.5 cm for improved visual proportion
• Baby → between 2 and 2.5 cm generally works better
In addition to these pieces, we will use a tape to cover the interior seams; its width will depend on the seam allowance specified in the pattern.
We will also need a covered button for the crown of the cap and, probably, a smaller one to finish the interior.
Baseball Cap – In One Minute
If you want to see the process summarized in a brief visual format, here is the corresponding Short. Lose one minute… and treat your ears to a ragtime by the great Scott Joplin.
Custom pattern